BlenderとUnityで山に囲まれたSkyboxを作る
はじめに
Blenderで山に囲まれたSkyboxを作り、
Unityで表示する方法について説明します。
Blender
アドオンの有効化
以下アドオンを有効にします
- Edit>Preferences>Add-ons
- Add Mesh ANT Landscape
- Node Wrangler
- Dynamic Sky
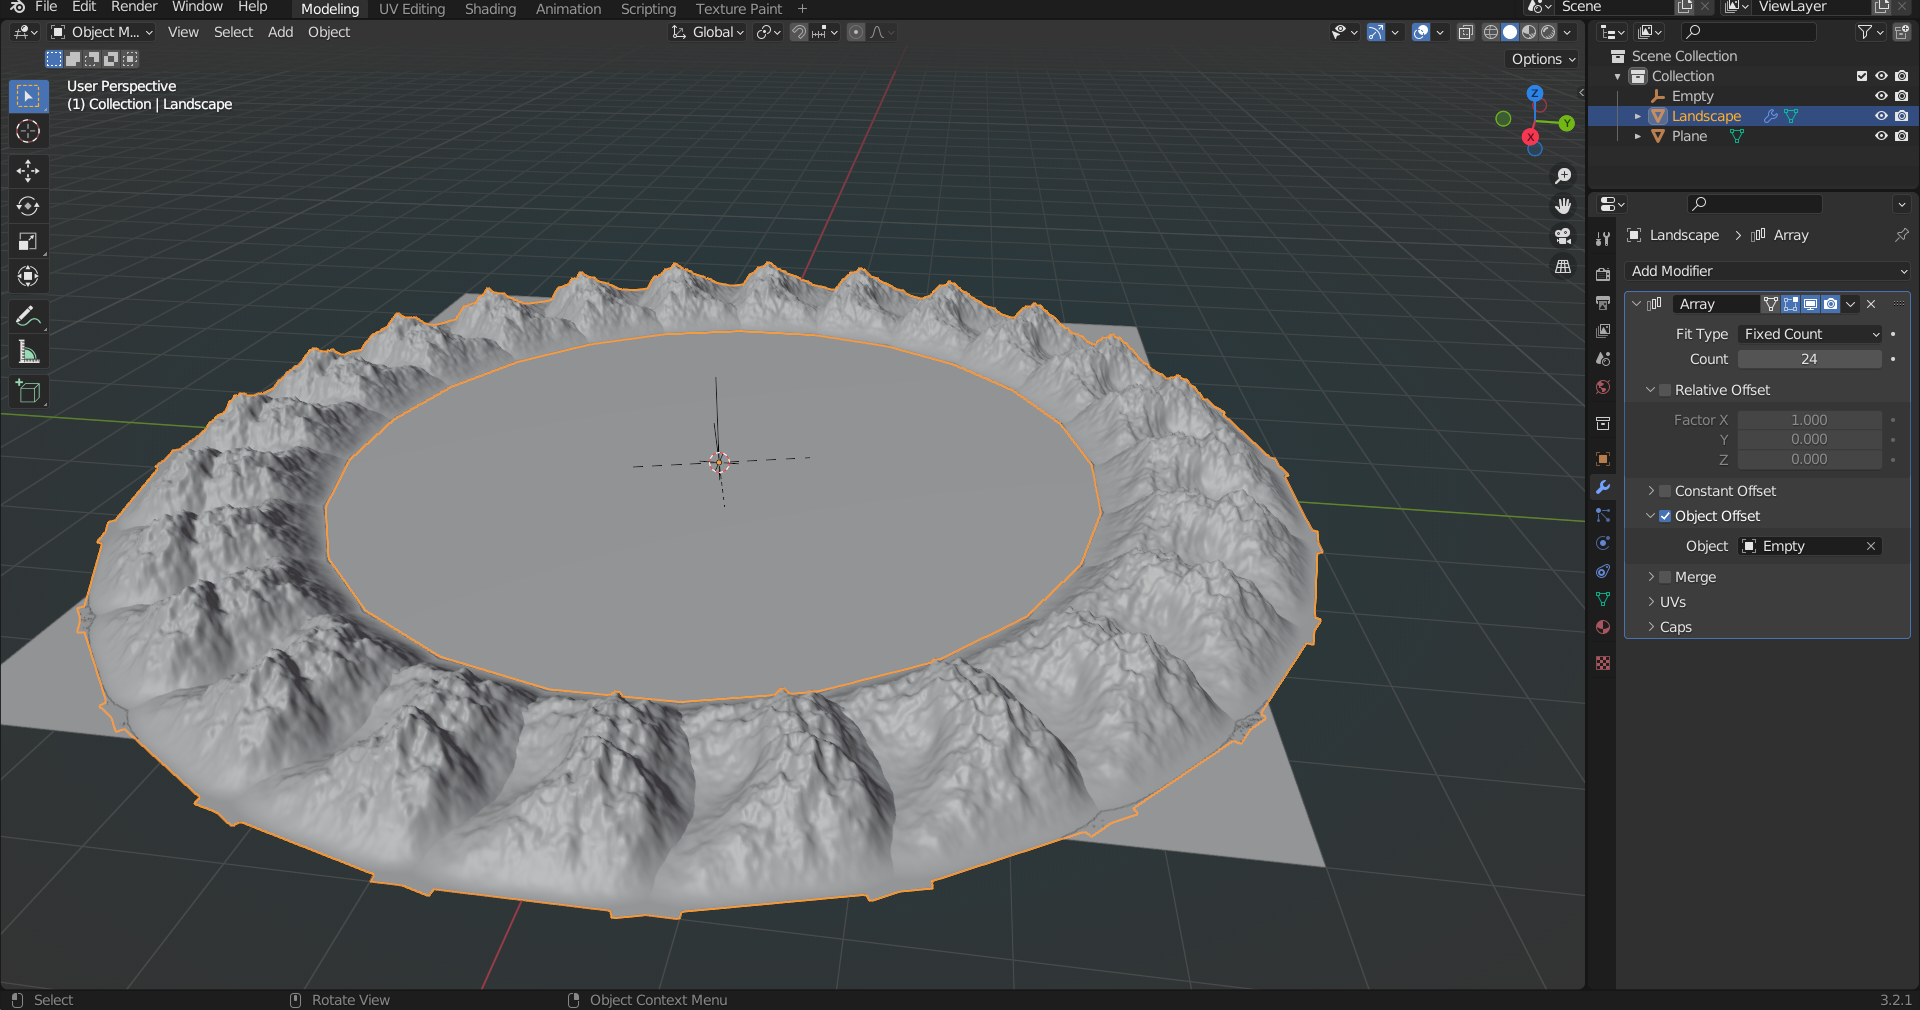
山と地面を作る
- Shift+A>Empty>Plain Axes
- Z方向に15°回転する
- Shift+A>Plane
- Groundという名前にする
- サイズを10mにする
- Shift+A>Mesh>Landscape
- Y方向に5m移動する
- Object>Set Origin>Origin to 3D Cursor
- Object>Apply>All Transforms
- Add Modifier>Array
- Count : 24
- Relative Offset : チェックを外す
- Object Offset : チェック
- Object : Empty
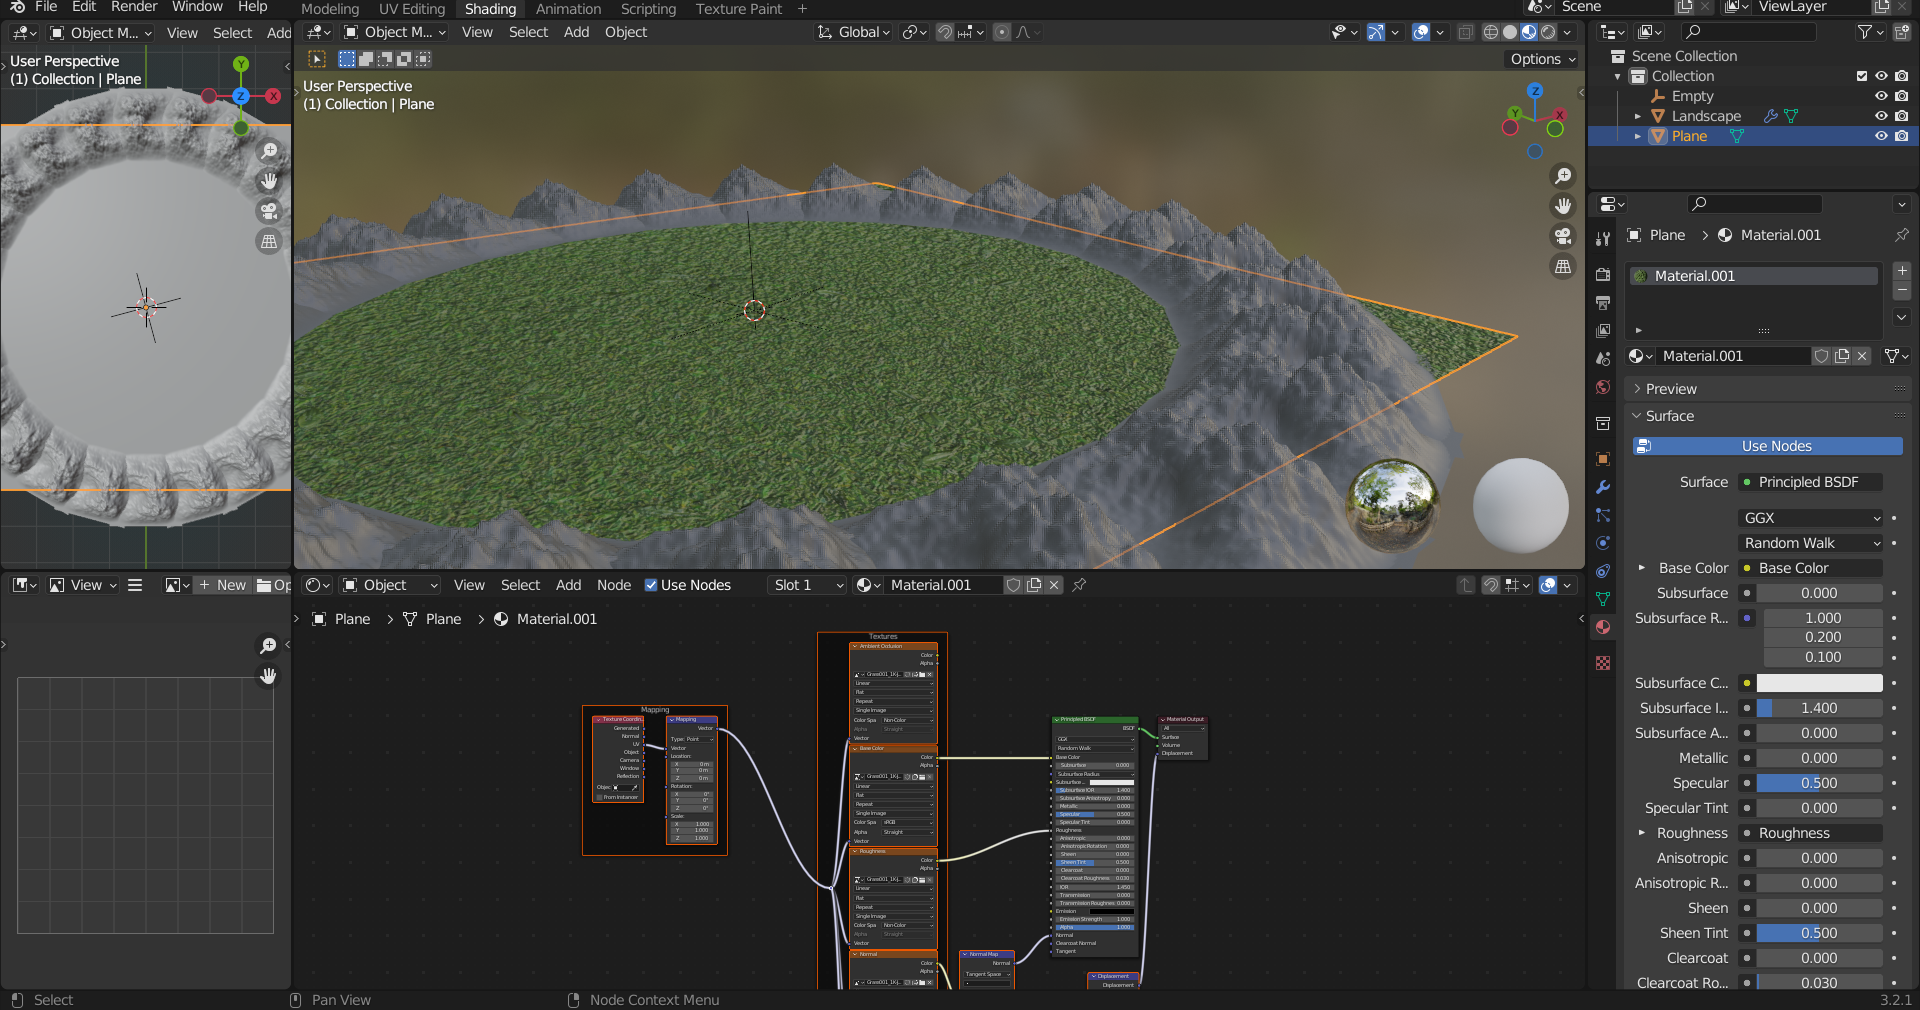
山と地面のテクスチャを設定する
今回は「https://ambientcg.com/」のテクスチャを使用します。
- Landscape>Material>New
- Shadingタブに移動
- Ctrl+Shift+T
- ambientcgでダウンロードしたデータをすべて選択
- Planeも同様にテクスチャを設定する
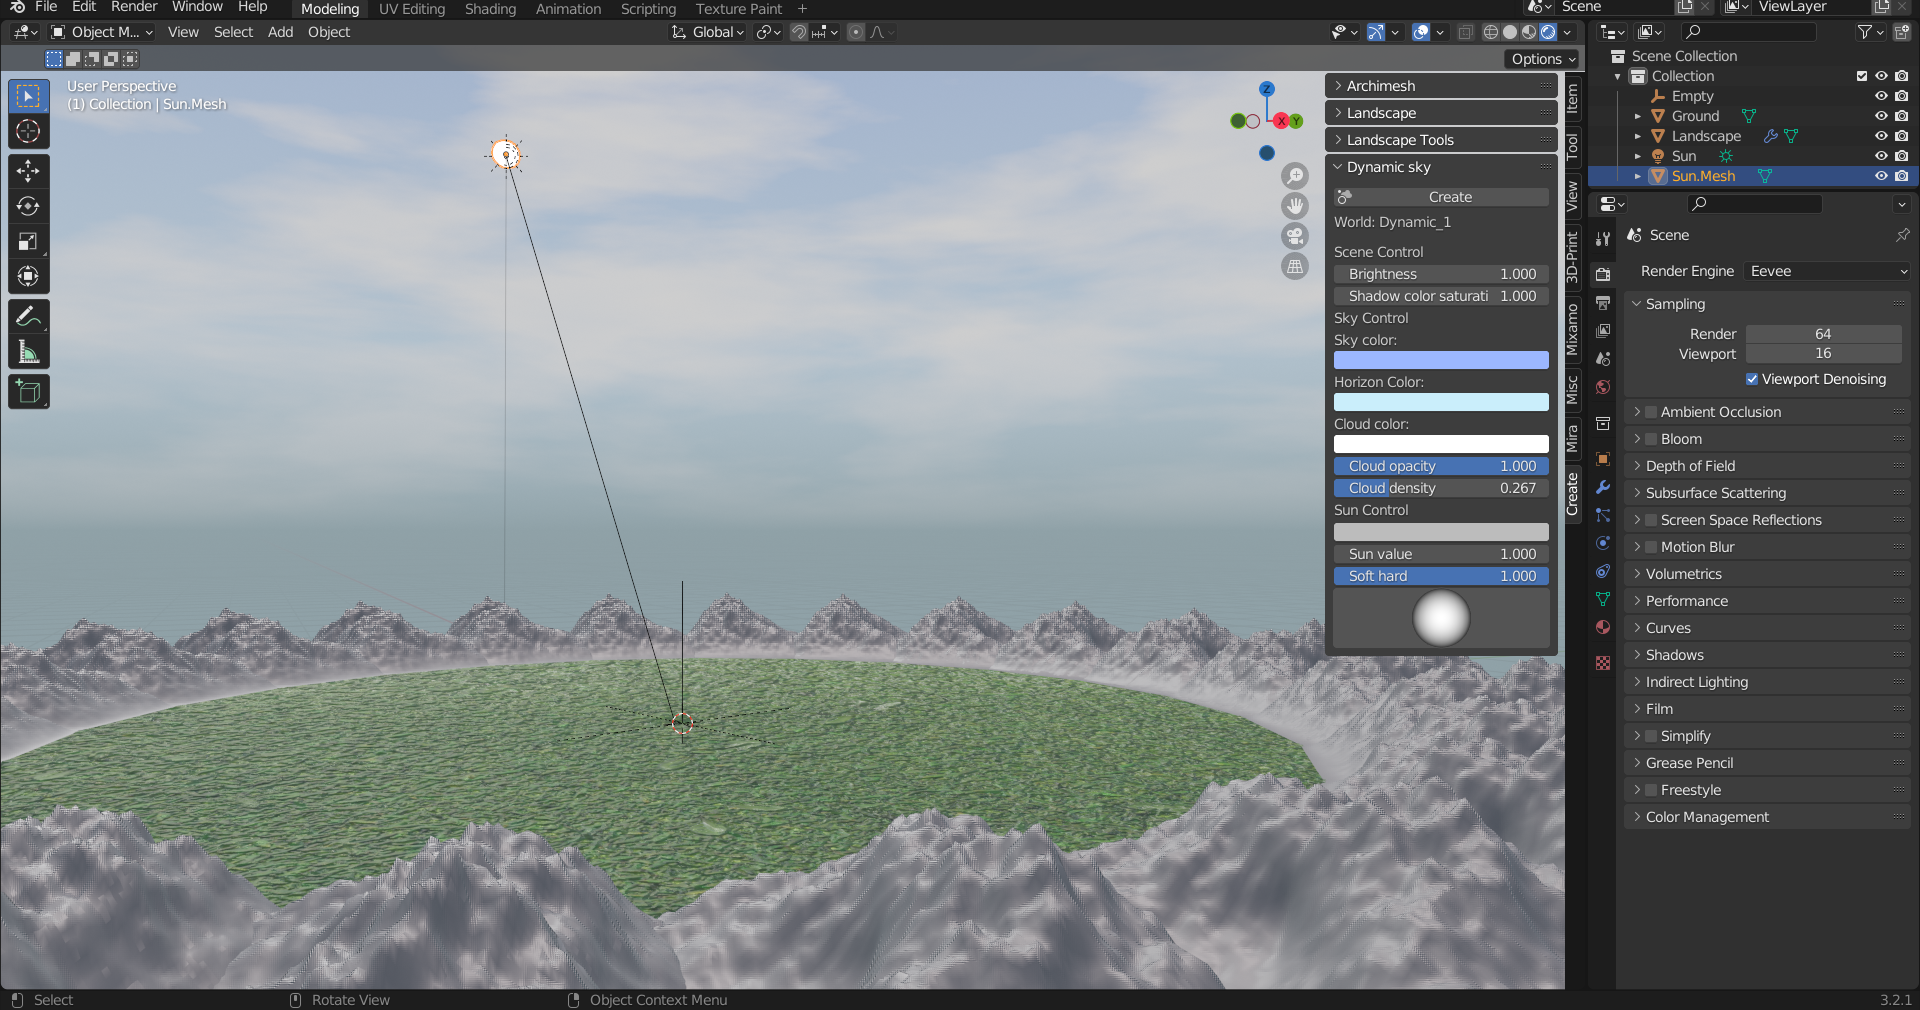
太陽を作る
- Shift+A>Light>Sun
- 適当な位置に配置
- Strength : 3
- Shift+A>Mesh>Circle
- Sun.Meshという名前にする
- Edit ModeにしてFで面を張る
- Sunと同じ位置まで移動し、スケールを調整
- Material
- Surface : Emission
- Strength : 30

空を作る
- サイドバー>Dynamic sky>Create
- World Properties>Dynamic_1を選択
- 設定を適当に調整
レンダリング
- Render Properties
- Render Engine : Cycles
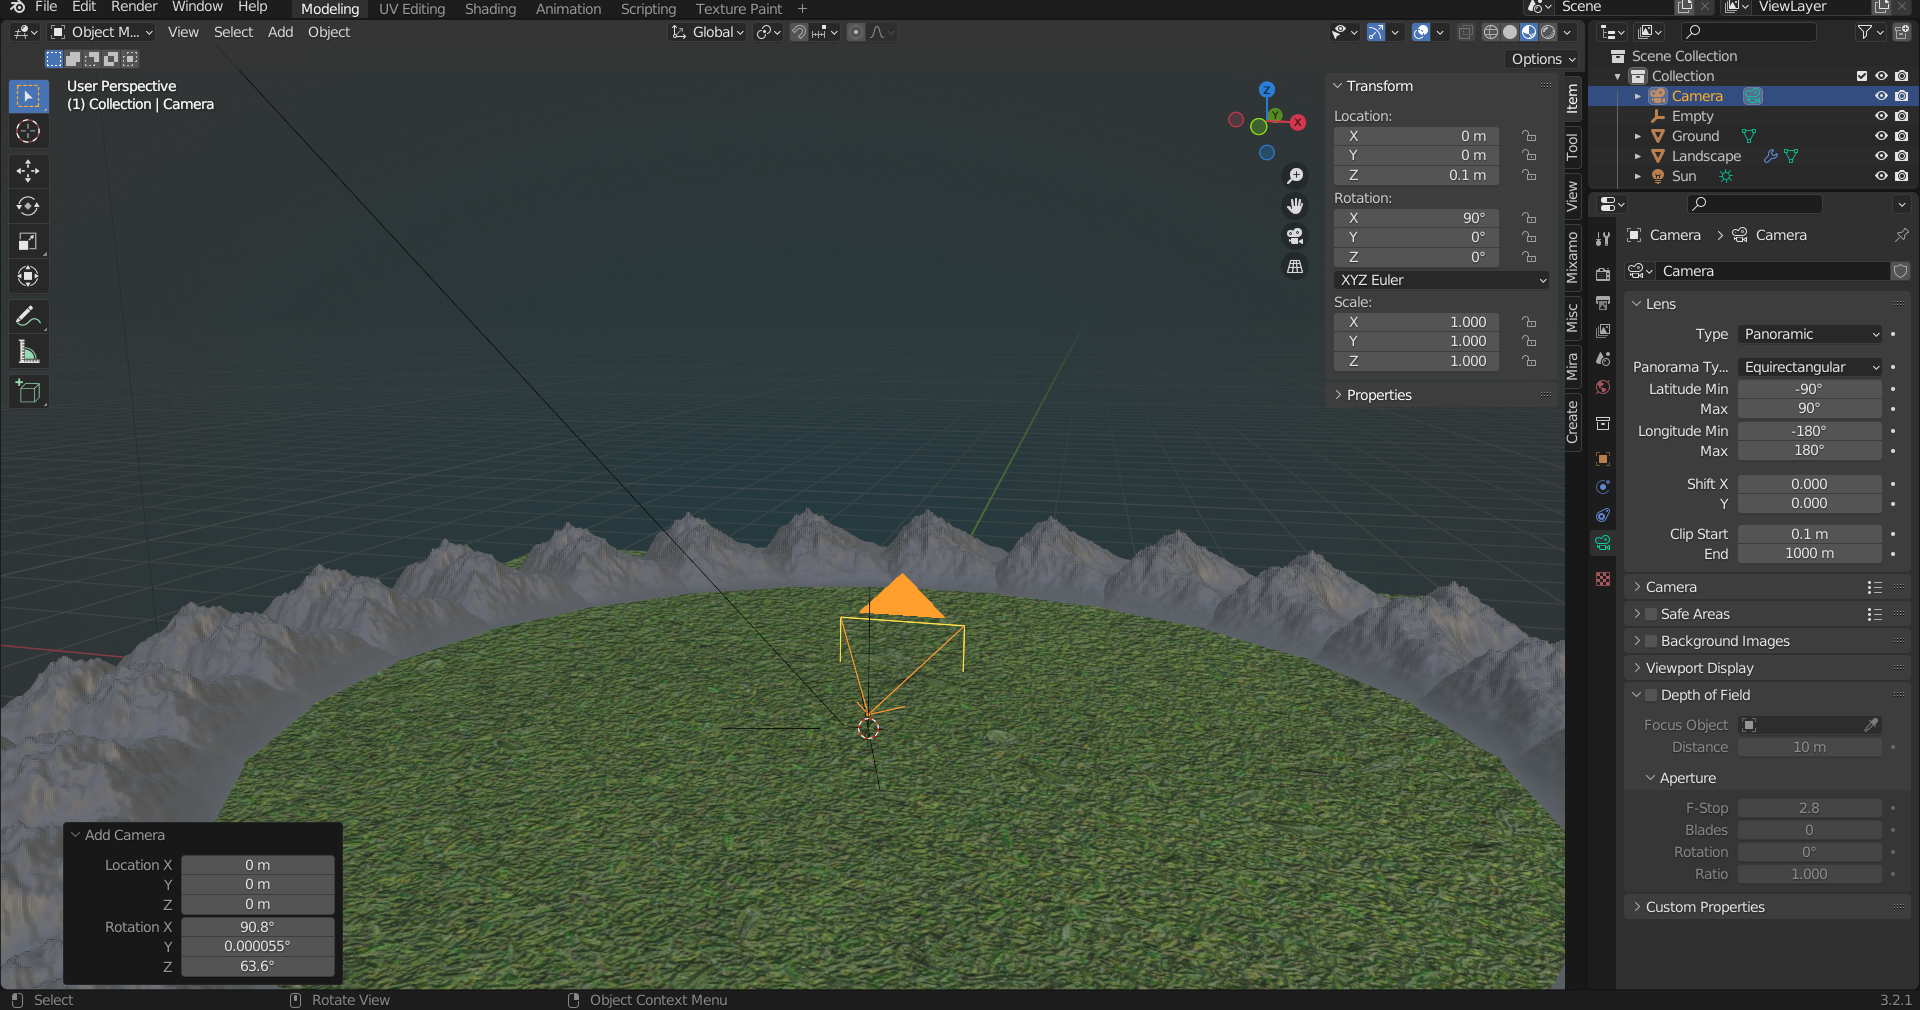
- Shift+A>Camera
- Location : 0, 0, 0.1
- Rotation : 90, 0, 0
- Object Data Properties
- Type : Panoramic
- Panorama Type : Equirectangular
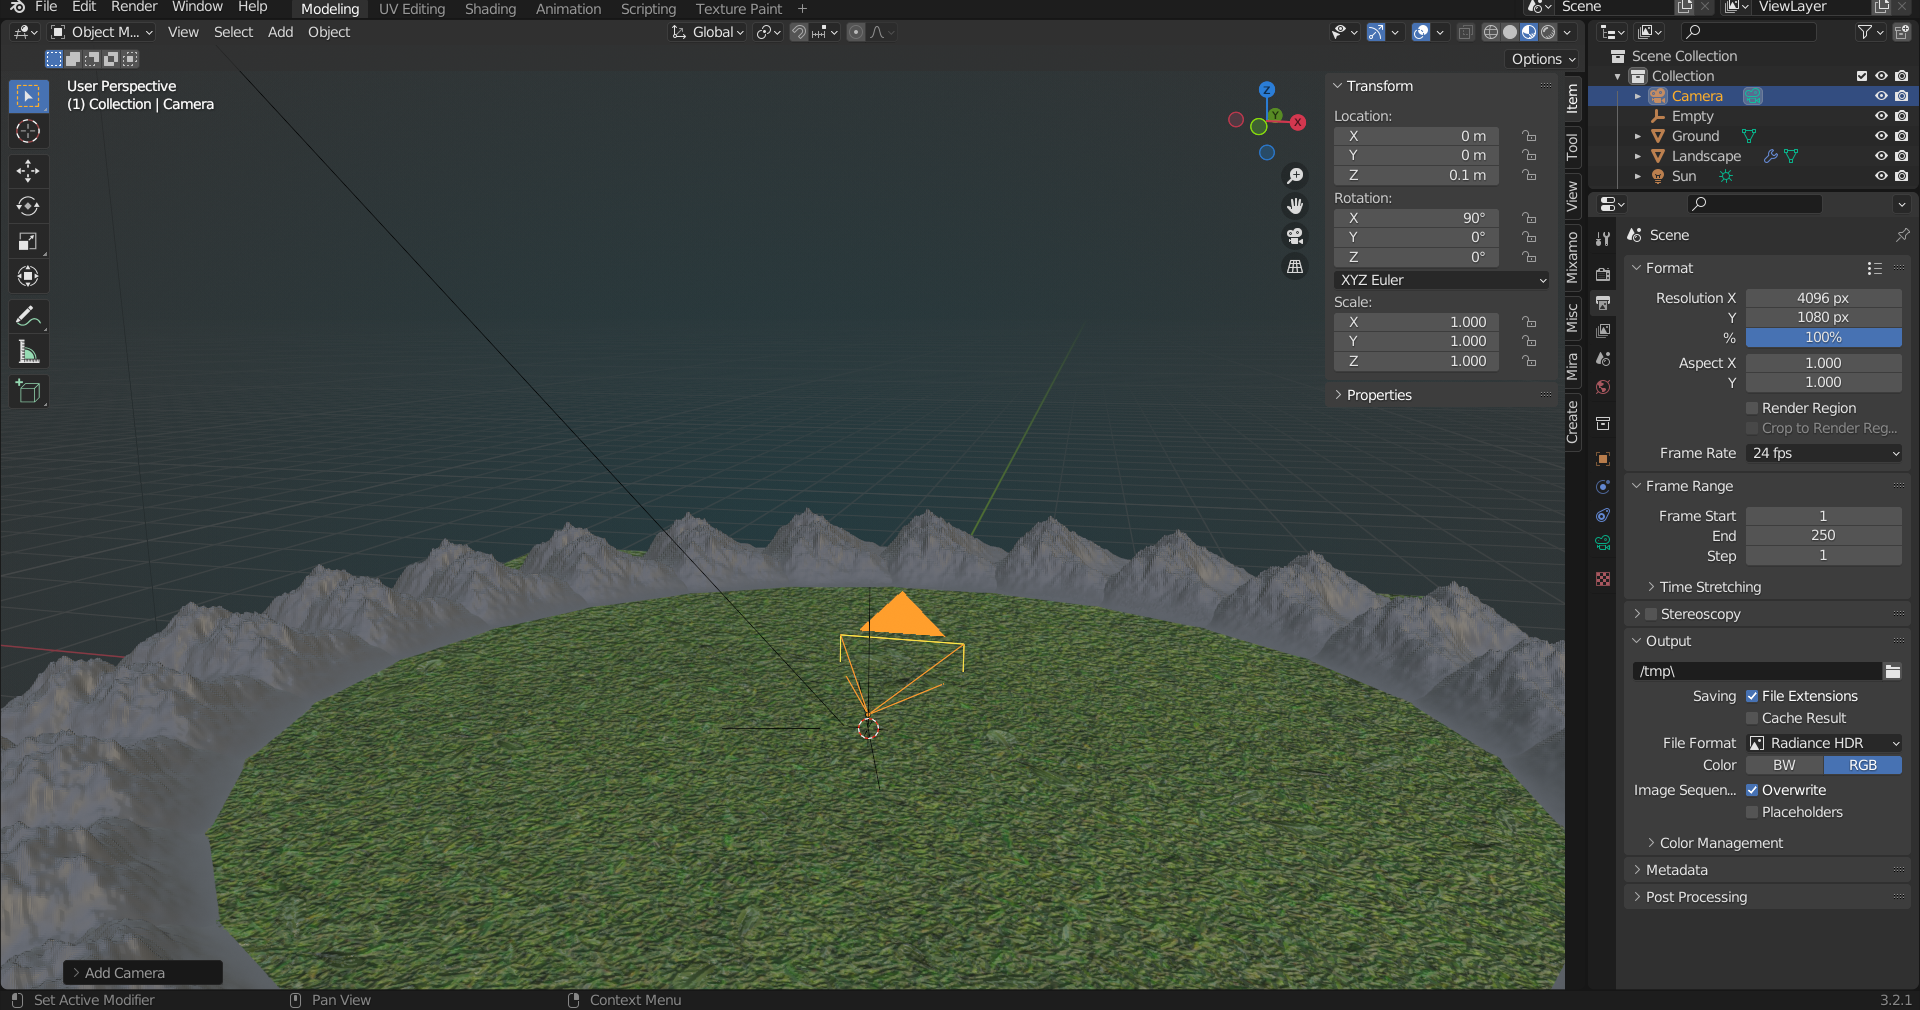
- Output Properties
- Resolution : X 4096, Y 2048
- File Format : Radiance HDR
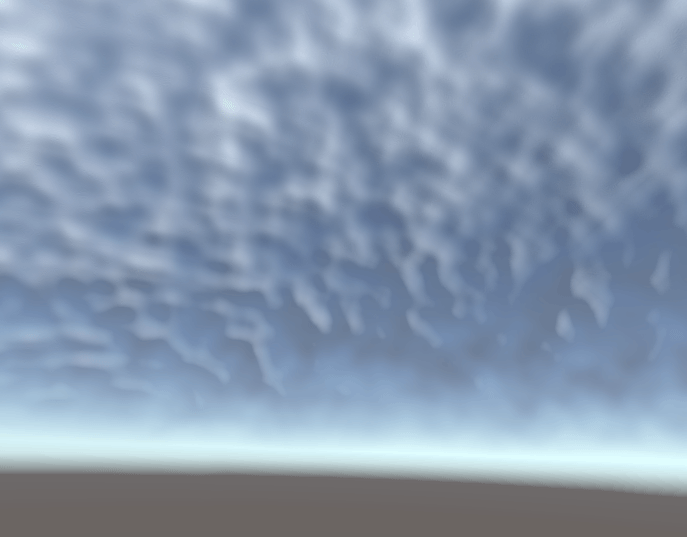
- Render>Render Image
Bloomをかける
- Compositingタブ
- Use Nodes
- Shift+A>Filter>Glare
- Fog Glow
- Render Layers>ImageとGlare>Imageを接続
- GlareをCtrl+Shift+左クリック

- Render>View Render
- Viwer Node
- Image>Save As
- 今回は「Mountain_Skybox.hdr」という名前で保存します
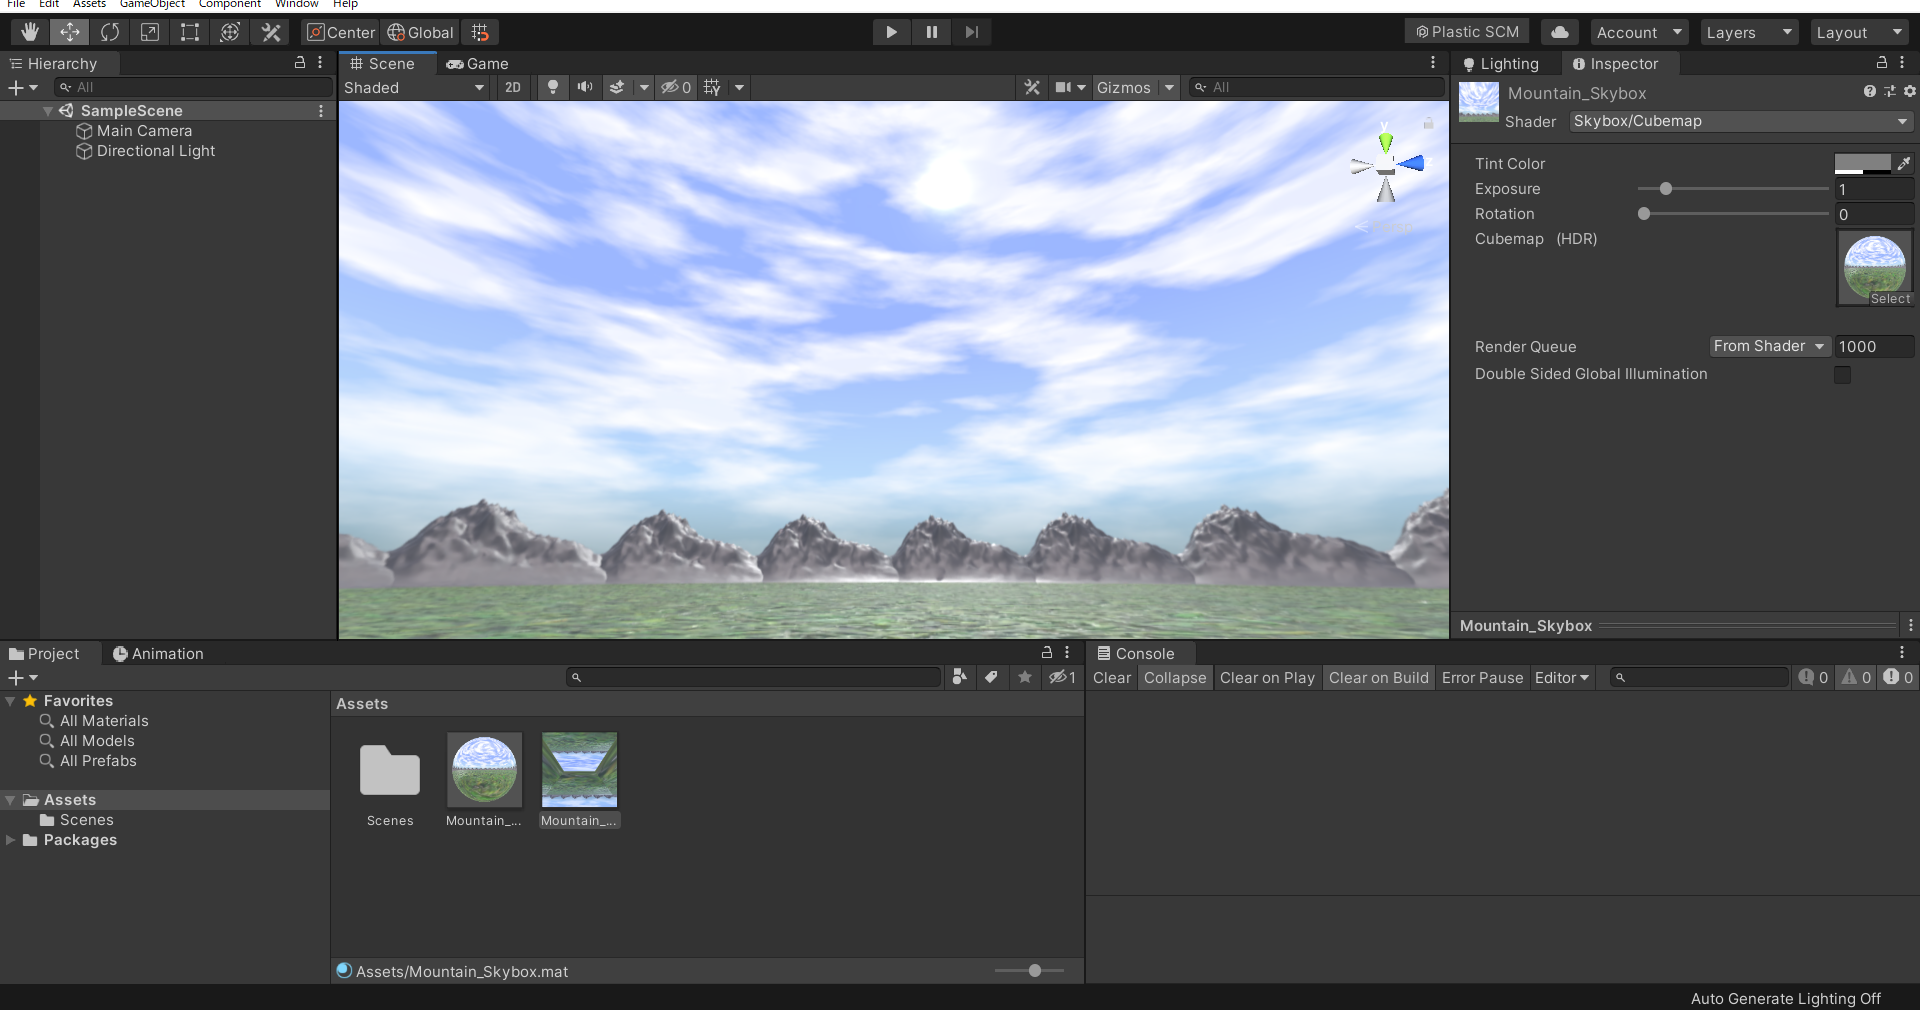
Unity
- Mountain_Skybox.hdr
- Texture Shape : Cube
- Apply
- Create>Material
- Shader : Skybox/Cubemap
- Cubemap : Mountain_Skybox.hdr
- シーンにドラッグアンドドロップ
参考サイト
- https://note.com/info_/n/n69997dfe8e08
- https://www.pentacreation.com/blog/2022/01/220101.html
- https://ceriseworks.com/dynamic-sky/
- https://note.com/info_/n/nce33546f57ab
- https://amethyst3d.net/tips/blender/blender-2-9-glow
- https://cgbox.jp/2023/07/20/unity-hdri/
バージョン
- Blender : 3.2.1
- Unity : 2019.4.31f1
Unity ShaderLabで流れる雲を作る
はじめに
UnityのShaderLabを使って流れる雲を作る方法を説明します。
UVスクロールを使うことで雲がアニメーションします。
ノーマルマップを使うことで影をつけます。
テクスチャを作る
雲のテクスチャ
雲のテクスチャを作成します。今回はGIMPで作成します。
- ファイル>新しい画像
- 今回はサイズを2048pxとしました
- レイヤー>透明部分>アルファチャンネルの追加
- 背景画像を削除して透明にする
- フィルター>下塗り>ノイズ>ソリッドノイズ
- Tileableにチェック
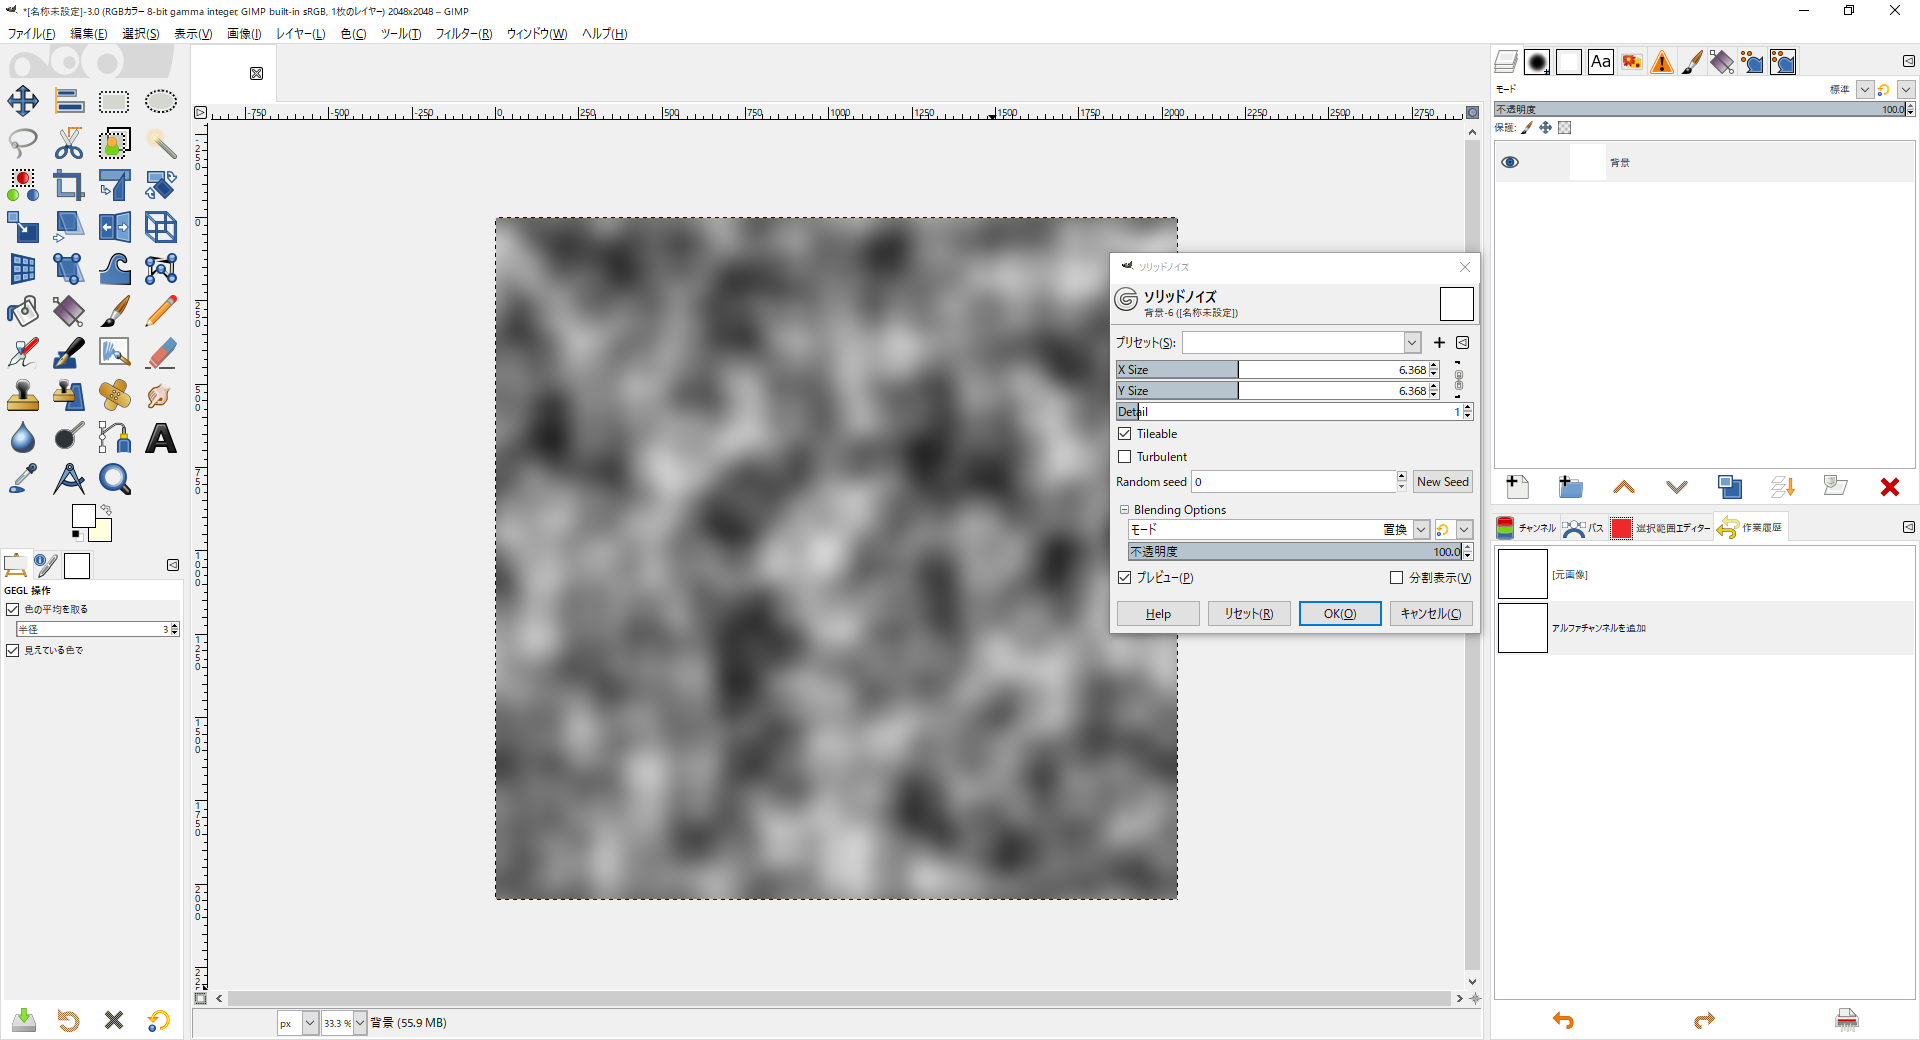
- 色>色を透明度に
- Color : 黒を選択
- ファイル>名前を付けてエクスポート
- 今回は「Cloud.png」という名前でエクスポートします
ノーマルマップ
- 雲のテクスチャで白黒画像を作るところまでは同様です
- フィルター>汎用>法線マップ
- Scaleを適当に調整します
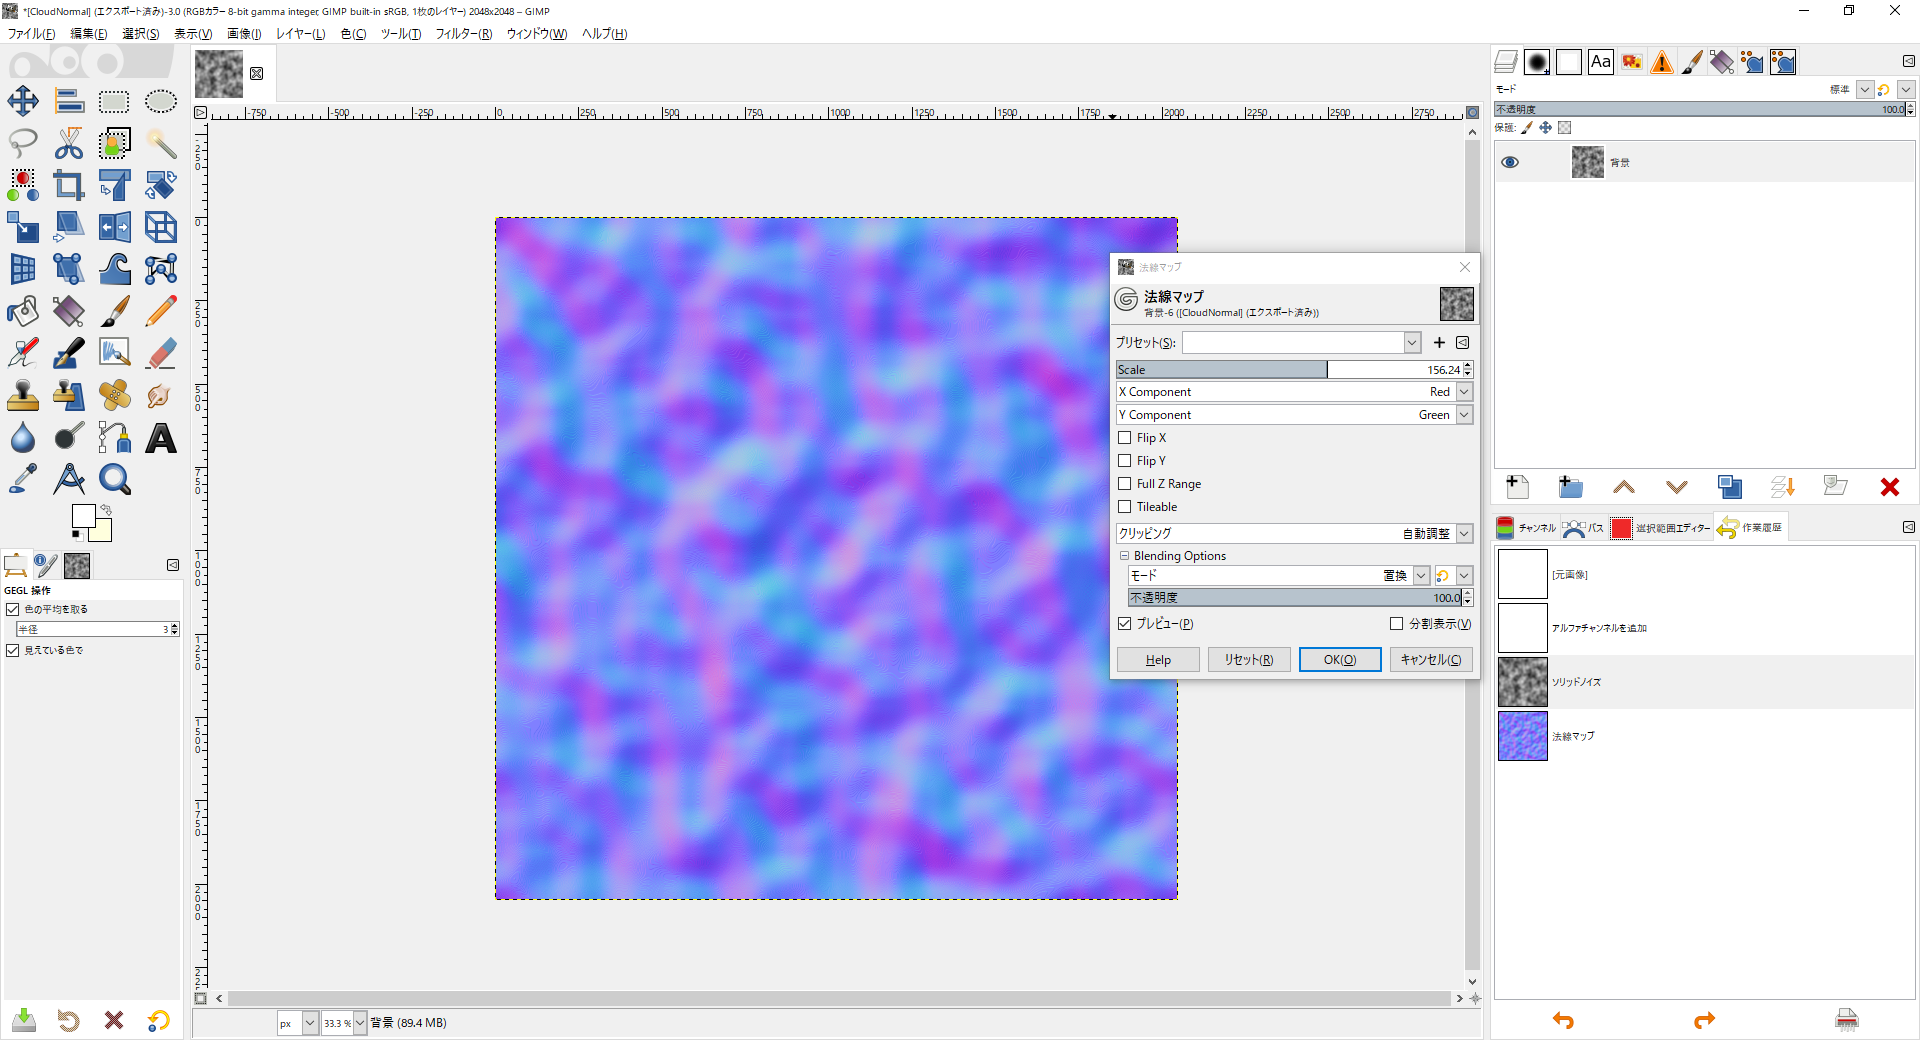
- ファイル>名前を付けてエクスポート
- 今回は「CloudNormal.png」という名前でエクスポートします
- UnityでTexture Type : Normal map に設定
マスクテクスチャ
外側を透明にするためのテクスチャを作成します。

真ん中は不透明で外側は透明なテクスチャです。
今回は「CloudMask.png」という名前で作成します。
モデルの作成
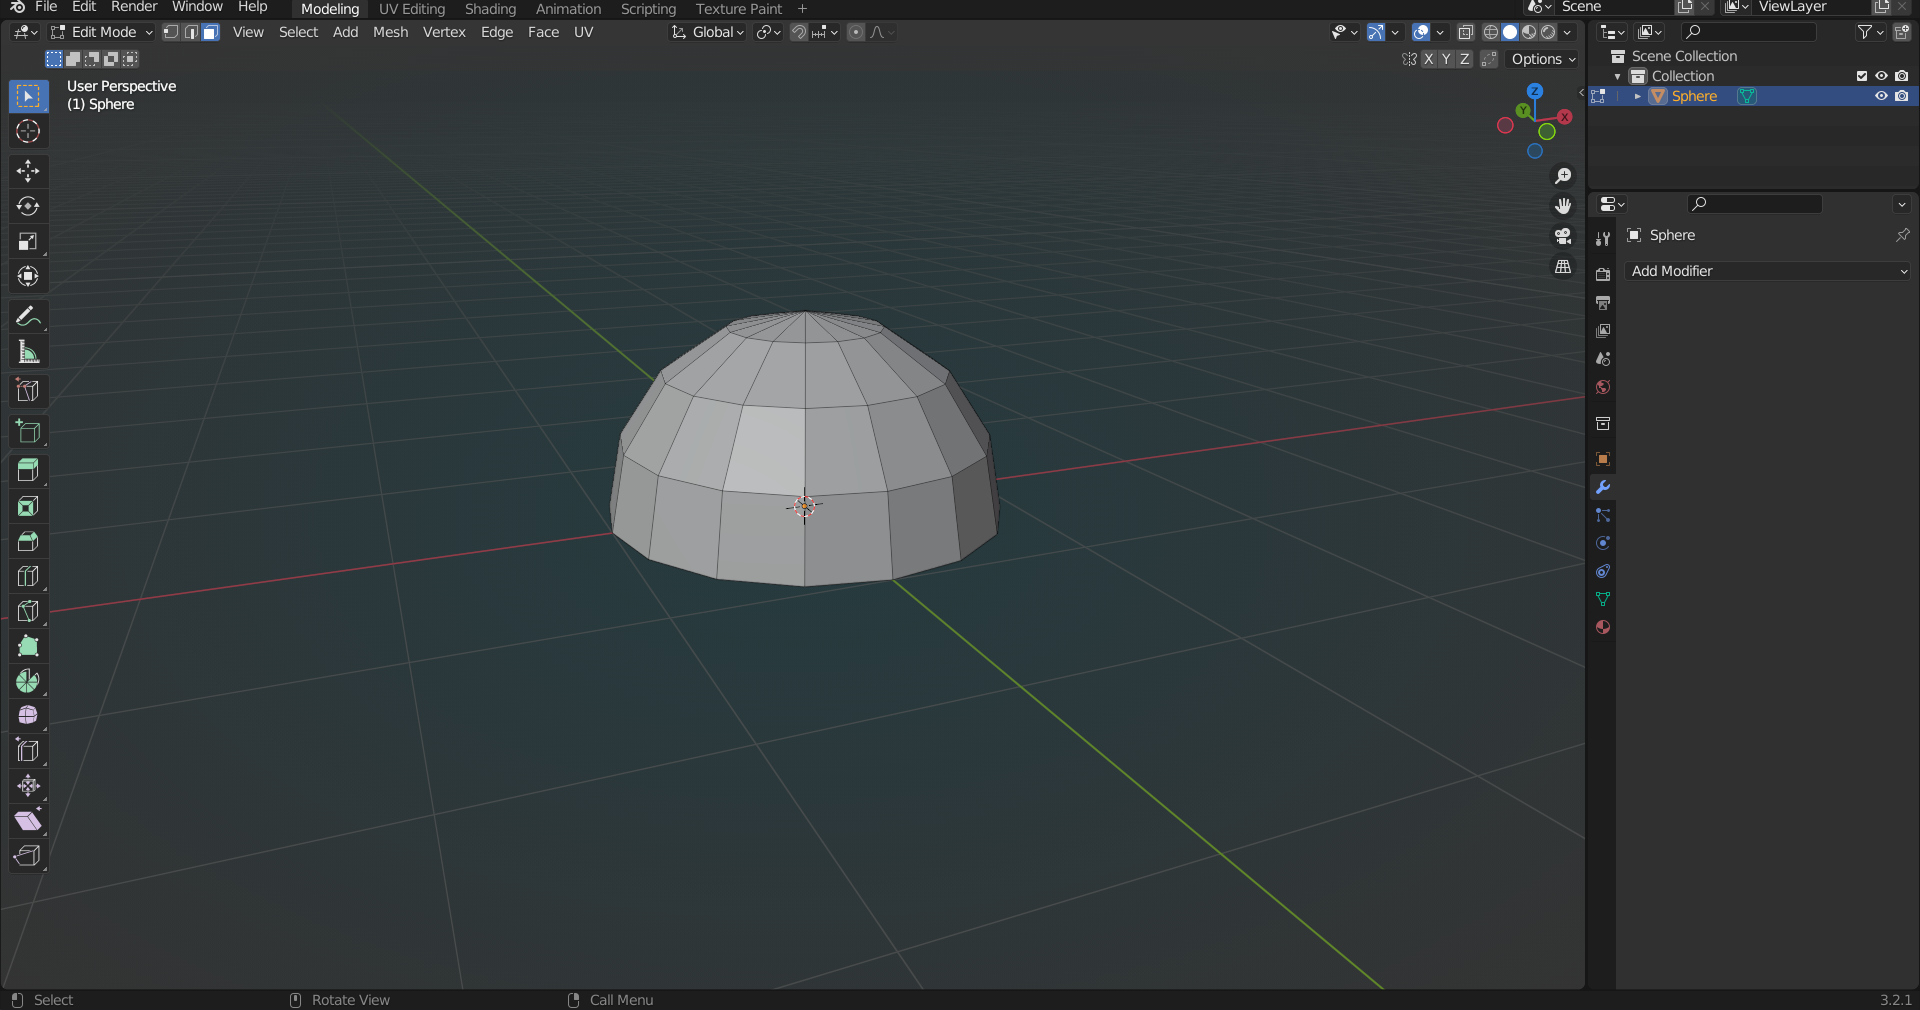
天球モデルを作成します。今回はBlenderで作成します。
- Add>Mesh>UV Sphere
- 下半分を削除します
- Object>Shade Smooth
- Add Modifier>Subdivision Surface
- モディファイアを適用
- UV>Unwrap
- File>Export>FBX
- 今回は「Cloud.fbx」という名前でエクスポートします

シェーダーの作成
Unityでシェーダーを作成します
- Create>Shader>Standard Surface Shader
以下のように記述します
Shader "Custom/Cloud"
{

    Properties
    {
        // 色
        _Color("Color", Color) = (1,1,1,1)
        // メインテクスチャ
        _MainTex("Albedo (RGB)", 2D) = "white" {}
        // ノーマルマップスケール
        _BumpScale("Normal Scale", Float) = 1.0
        // ノーマルマップ
        [Normal] _BumpMap("Normal Map", 2D) = "bump" {}
        // マスクテクスチャ
        _MaskTex("Mask", 2D) = "white" {}
        // スクロールX速度
        _ScrollX("Scroll X Speed", float) = 0
        // スクロールY速度
        _ScrollY("Scroll Y Speed", float) = 0
    }
    SubShader
    {
        // 透過
        Tags { "RenderType" = "Transparent" "Queue" = "Transparent" }
        LOD 200
        // 背面も表示
        Cull Off

        CGPROGRAM
        // Physically based Standard lighting model, and enable shadows on all light types
        // 透過
        #pragma surface surf Standard fullforwardshadows alpha:blend

        // Use shader model 3.0 target, to get nicer looking lighting
        #pragma target 3.0

        sampler2D _MainTex;

        struct Input
        {
            float2 uv_MainTex;
            float2 uv_BumpMap;
            float2 uv_MaskTex;
        };

        fixed4 _Color;
        float _ScrollX, _ScrollY;
        sampler2D _MaskTex;
        sampler2D _BumpMap;
        half _BumpScale;

        // Add instancing support for this shader. You need to check 'Enable Instancing' on materials that use the shader.
        // See https://docs.unity3d.com/Manual/GPUInstancing.html for more information about instancing.
        // #pragma instancing_options assumeuniformscaling
        UNITY_INSTANCING_BUFFER_START(Props)
            // put more per-instance properties here
        UNITY_INSTANCING_BUFFER_END(Props)

        void surf(Input IN, inout SurfaceOutputStandard o)
        {
            // UVスクロール量を計算
            float2 scroll = float2(_ScrollX, _ScrollY) * _Time.y;

            // Albedo comes from a texture tinted by color
            fixed4 c = tex2D(_MainTex, IN.uv_MainTex + scroll) * _Color;
            o.Albedo = c.rgb;
            // ノーマルマップを計算
            o.Normal = UnpackScaleNormal(tex2D(_BumpMap, IN.uv_BumpMap + scroll), _BumpScale);

            // マスク
            fixed4 mask = tex2D(_MaskTex, IN.uv_MaskTex);
            o.Alpha = c.a * mask.a;
        }
        ENDCG
    }
    FallBack "Diffuse"
}
マテリアルの作成
Unityでマテリアルを作成します。
- Create>Material
- 今回は「Cloud.mat」という名前で作成します
- Shader : Custom/Cloud
- Albedo : Cloud.png
- Normal Map : CloudNormal.png
- Mask : CloudMask.png
- Scroll X/Y : 適当な値
モデルの配置
Unityでモデルを配置します
- Cloud.fbxをシーンに配置
- Scallは今回500にしました
- Mesh Renderer>Materials : Cloud.mat

参考サイト
- https://styly.cc/ja/tips/unity_flowingcloud/
- https://qiita.com/kaiware007/items/ffe7c546bc71136cf8da
バージョン
VRChatワールド開発テスト環境構築の例
VRChatの開発ツール導入ではなく、UdonSharpで開発・テストする上での
ノウハウをまとめた記事になります。
独学なのでこれが正しい・最適とは限らないことに注意です。
VRChatの説明ですが、ほかのプラットフォームでも使えるはずです。
方針
- Unityはクラッシュする前提で構築する
- クラッシュするとシーン・プレハブが壊れることがある
- クラッシュしても大丈夫なように、シーン・プレハブはEditorで自動生成する
- テスト用と製品用のスクリプトを分ける
- テスト用はブレイクポイントが使えるようにVRChatによならいコードにする
- テスト用から製品用のスクリプトを自動生成する
開発手順図

- テスト用スクリプトMockScriptを作成し、シーンMockSceneに配置する
- MockSceneのテストMockTestを行う
- MockScriptをビルドし製品用スクリプトProductScriptを作成、シーンProductSceneに配置する
- ProductSceneのテストをClientSimで行う
- ProductSceneをビルドしVRChatアプリを作成、ローカルテストを行う
- ProductSceneをアップロードしオンラインテストを行う
次の項から開発手順を詳しく説明していきます。
Assembly definitionの作成
プロジェクトの設定が終わったら、最初にAssembly definitionを作成します。
テスト用スクリプトのための「Mocksフォルダ」、
製品用スクリプトのための「Scriptsフォルダ」、
Editor拡張用のための「Editorフォルダ」以下に下記
Assembly definitionを作成します。
まず、Mocksフォルダ以下にAssembly definitionを作成します。
手順
- Create > Assembly definition
- MockAssemblyという名前で保存する
次に、Scriptsフォルダ以下にAssembly definitionと
U# Assembly Definitionを作成します。
手順
- Create > Assembly definition
- ProductAssemblyという名前で保存する
- Assembly Definition References
- VRC.SDK3
- VRC.SDKBase
- VRC.Udon
- UdonSharp.Runtime
- Apply
- Create > U# Assembly definition
- Source Assembly : ProductAssembly
- Apply
最後に、UdonSharpのEditorユーティリティを使えるようにするため、
Editorフォルダ以下にAssembly definition referenceを作成します。
手順
- Create > Assembly Definition Reference
- Assembly Definition : UdonSharp.Editor を選択
- Apply
テスト・製品用スクリプトの初期生成
Editor拡張でファイル名を入力すると、テスト・製品用スクリプトを
自動生成するスクリプトを作成しました。
テスト用スクリプトは「Mocks/Mockスクリプト名.cs」、製品用スクリプトは
「Scripts/スクリプト名.cs」という名前で配置するようにしました。
スクリプトは以下です。
using System.IO;
using UdonSharp;
using UnityEditor;
using UnityEngine;

namespace UdonSharpEditor
{
    internal class CreateScript : EditorWindow
    {
        public string Text;

        string TemplatePath = @"C:\Program Files\Unity\Hub\Editor\2019.4.31f1\Editor\Data\Resources\ScriptTemplates\81-C# Script-NewBehaviourScript.cs.txt";

        [MenuItem("My Window/My Editor")]
        public static void MyEditorWindow()
        {
            GetWindow(typeof(CreateScript));
        }
        void OnGUI()
        {
            Text = EditorGUILayout.TextField("Script", Text);
            if (GUILayout.Button("Create Script"))
            {

                CreateUSharpScript($"Assets/Scripts/{Text}.cs");
                ProjectWindowUtil.CreateScriptAssetFromTemplateFile(TemplatePath, $"Assets/Mocks/Mock{Text}.cs");
            }
        }

        private static void CreateUSharpScript(string chosenFilePath)
        {
            // Packages\com.vrchat.udonsharp\Editor\Editors\UdonSharpBehaviourEditor.cs CreateUSharpScript() を参考に作成
        }
    }
}
テスト用スクリプトの生成はProjectWindowUtil.CreateScriptAssetFromTemplateFile
を使用しました。
UdonSharpの自動生成は「Packages\com.vrchat.udonsharp\Editor\Editors\UdonSharpBehaviourEditor.cs CreateUSharpScript()」
を参考にしました。
テスト用スクリプトの記述
ゲームのロジック部のスクリプトを記述します。
できるだけテスト用と製品用どちらでも動作するように、
基本的にUdonSharpに依存しないようにスクリプトを書いていきます。
もしテスト用と製品用でコードを分けたい場合は以下のように
PRODUCT defineを使用して分岐します。
PRODUCT defineは後述するように製品用スクリプトだけで定義されます。
#if !PRODUCT
    // テスト用コード
#else
    // 製品用コード
#endif
製品用スクリプトの生成
テスト用スクリプトから製品用スクリプトを生成します。
基本的にテスト用スクリプトをそのままコピーして製品用スクリプトにします。
足りない部分はUdonSharp専用の処理を追加します。
以下で詳しい手順を説明します。
Makeファイルの作成
変更したファイルのスクリプトだけを生成するため、
Makeファイルを作成するようにしました。
MakeファイルはPythonで作成しました。
import os
from glob import glob
import pathlib
import textwrap

PROJECT_NAME = 'MyProject'
mock_files_abs_path = glob(f'{PROJECT_NAME}/Assets/Mocks/*.cs')
mock_files = [
    pathlib.Path(file).relative_to(f'{PROJECT_NAME}')
    for file in mock_files_abs_path
]
script_files = []
for mock_file in mock_files:
    mock_file_base = os.path.basename(mock_file)
    script_file_base = mock_file_base.replace('Mock', '')
    script_files += [f'Assets/Scripts/{script_file_base}']

makefile = f"""
.PHONY: all clean
all: {' '.join(script_files)}
"""

for mock_file, script_file in zip(mock_files, script_files):
    makefile += textwrap.dedent(f"""
    {script_file}:{mock_file} make.py
    \tpython make.py $@ $<
    """)

with open(f'{PROJECT_NAME}/Makefile', 'w') as f:
    f.write(makefile)
上記を実行すると、以下のようなMakeファイルが作成されます。
.PHONY: all clean
all: Assets/Scripts/MyScript1.cs Assets/Scripts/MyScript2.cs

Assets/Scripts/MyScript1.cs:Assets\Mocks\MockMyScript1.cs make.py
    python make.py $@ $<

Assets/Scripts/MyScript2.cs:Assets\Mocks\MockMyScript2.cs make.py
    python make.py $@ $<
上記は、MockMyScript1.csからMyScript1.csを、
MockMyScript2.csからMyScript2.csをMakeする例です。
Makeコマンドの実行
作成したMakeファイルに対してMakeコマンドを実行すると以下の
「make.py」が実行されます。
import os
import re
from glob import glob
import sys

script_file_path = sys.argv[1]
mock_file_path = sys.argv[2]

def get_mock_classes():
    files = glob(f'{module_dir}/Assets/Mocks/*.cs')
    classes = {}
    for file in files:
        _class = os.path.splitext(os.path.basename(file))[0]
        target_class = _class.replace('Mock', '')
        classes[_class] = target_class
    return classes
mock_classes = get_mock_classes()

with open(mock_file_path, encoding='utf-8') as f:
    mock_strs = f.read()

mock_strs = '''
#define PRODUCT
using UdonSharp;
using VRC.SDKBase;
using VRC.Udon;
using VRC.Udon.Common.Interfaces;
using VRC.SDK3.Components;
''' + mock_strs

replace_items = [
    (rf'class {config["mock_prefix"]}(\w+)', r'class \g<1>'),
    ('MonoBehaviour', 'UdonSharpBehaviour'),
    (r'Debug.Assert\((.+)\)', r'if (!(\g<1>)) Debug.LogError($"Assert {name} (\g<1>) (at __FILE__)")'),
]
for replace_item in replace_items:
    mock_strs = mock_strs.split("\n")
    replace_item1 = replace_item[1].replace("__FILE__", script_file_path)
    for i,mock_str in enumerate(mock_strs):
        mock_strs[i] = re.sub(replace_item[0], replace_item1, mock_str)
    mock_strs = "\n".join(mock_strs)
for _class, target_class in mock_classes.items():
    mock_strs = mock_strs.replace(_class, target_class)

if not os.path.isfile(script_file_path):
    raise FileNotFoundError(script_file_path)
with open(script_file_path, 'w', encoding='utf-8') as f:
    f.write(mock_strs)
「make.py」はテスト用スクリプトをコピーして
製品用スクリプトを作成した後、以下のようなUdonSharp用の
変更を行っています。
PRODUCT defineの追加
先頭行に「#define PRODUCT」を追加します。
usingの追加
UdonSharpのusingを追加します。
Assertの変更
VRChatではAssertが使えないため、
「Debug.Assert」を「Debug.LogError」に変更しています。
シーンの生成
テスト用シーン「MockScene.unity」、製品用シーン「ProductScene.unity」
をEditor拡張で自動生成するようにしました。
GameObjectはテスト・製品用シーンで共通の構造とし、Prefab化することで
共通化しました。
次からEditor拡張でシーンを生成する手順を説明します。
シーンを開く
まずプレハブを作るために、テスト用シーンを開きます。
string scenePath = "Assets/MockScene.unity";
var scene = EditorSceneManager.OpenScene(scenePath);
環境プレハブの作成
次に環境をまとめたプレハブ「Environment.prefab」を作成します。
static GameObject AddPrefab(string path, string name, out GameObject prefab, GameObject parent=null)
{
    prefab = AssetDatabase.LoadAssetAtPath<GameObject>(path);
    Debug.Assert(prefab != null, $"{path} {name}");
    GameObject obj = PrefabUtility.InstantiatePrefab(prefab) as GameObject;
    //Undo.RegisterCreatedObjectUndo(obj, "Create GameObject");
    if (parent != null) obj.transform.SetParent(parent.transform, false);
    obj.name = name;
    return obj;
}

var Environment = AddEmptyGameObject("Environment");
AddPrefab("Packages/com.vrchat.worlds/Samples/UdonExampleScene/Prefabs/VRCWorld.prefab", "VRCWorld", out _, Environment);
ルートGameObjectの作成
次にテスト・製品用ルートGameObject「Mocks」・「Products」を作成します。
static GameObject AddEmptyGameObject(string name, GameObject parent=null)
{
    GameObject obj = new GameObject(name);
    //Undo.RegisterCreatedObjectUndo(obj, "Create GameObject");
    if (parent != null) obj.transform.SetParent(parent.transform, false);
    return obj;
}
var Mocks = AddEmptyGameObject("Mocks");
var Products = AddEmptyGameObject("Products");
共通プレハブの作成
次にテスト・製品用共通プレハブ「SceneMgr.prefab」を作成します。
var SceneMgr = AddEmptyGameObject("SceneMgr");

// SceneMgr以下にGameObjectの作成、マテリアルの設定、オーディオの設定などを行う

string SceneMgrPrefabPath = "Assets/Prefabs/SceneMgr.prefab";
PrefabUtility.SaveAsPrefabAssetAndConnect(SceneMgr, SceneMgrPrefabPath, InteractionMode.AutomatedAction);
DestroyImmediate(SceneMgr);
スクリプトのAddComponent
次にテスト・製品用のSceneMgr.prefabにそれぞれのスクリプトをAddComponentします
static MonoBehaviour AddScriptComponent(object root, string objPath, string path, string objType, string scriptPathPrefix, bool enabled = false)
{
    string _path = scriptPathPrefix + path;
    GameObject _root = null;
    if (root is GameObject) _root = root as GameObject;
    else _root = (root as MonoBehaviour).gameObject;
    Debug.Assert(root != null, $"{root.GetType().Name} {objPath} {_path}");
    GameObject obj;
    if (objPath == "")
    {
        obj = _root;
    }
    else
    {
        Transform transform = _root.transform.Find(objPath);
        Debug.Assert(transform != null, $"Transform Not Found {root.GetType().Name} {objPath} {_path}");
        obj = _root.transform.Find(objPath).gameObject;
    }
    Debug.Assert(obj != null, $"{objPath} {_path}");
    var script = AssetDatabase.LoadAssetAtPath<MonoScript>(_path);
    Debug.Assert(script != null, $"Script Not Found {objPath} {_path}");
    MonoBehaviour component;
    if (objType == "Mock")
    {
        //component = (MonoBehaviour)Undo.AddComponent(obj, script.GetClass());
        component = (MonoBehaviour)obj.AddComponent(script.GetClass());
        component.enabled = enabled;
    }
    else
    {
        //var udonSharpComponent = UdonSharpEditor.UdonSharpUndo.AddComponent(obj, script.GetClass());
        var udonSharpComponent = obj.AddUdonSharpComponent(script.GetClass());

        udonSharpComponent.enabled = enabled;
        component = udonSharpComponent;
    }
    return component;
}

foreach (var objType in new string[] { "Mock", "Product" })
{
    var root = (objType == "Mock") ? Mocks : Products;
    var scriptPefix = (objType == "Mock") ? "Mock" : "";
    var prefabPefix = (objType == "Mock") ? "Mock" : "Product";
    var dir = (objType == "Mock") ? "Mocks" : "Scripts";
    var scriptPathPrefix = $"Assets/{dir}/{scriptPefix}";

    var SceneMgr = AddPrefab("Assets/Prefabs/SceneMgr.prefab", "SceneMgr", out _, root);

    AddScriptComponent(SceneMgr, "", "SceneMgr.cs", objType, scriptPathPrefix, true);
    AddScriptComponent(SceneMgr, "MyObj", "MyObj.cs", objType, scriptPathPrefix);
}
UIの設定
次に製品用のGameObjectにボタンなどのUIを設定します。
詳しくはUdonSharpのボタンクリックイベントをUnityEditor拡張で登録するをご覧ください。
さらに製品用のGameObjectにVRCUiShapeなどUdon独自のUIを設定します。
var MyUi = SceneMgr.transform.Find('MyUi').gameObject;
MyUi..AddComponent<VRCUiShape>();
var MyAudio = SceneMgr.transform.Find('MyAudio').gameObject;
MyAudio.AddComponent<VRCSpatialAudioSource>();
プレハブ・シーンの保存
最後に作成したGameObjectをプレハブ・シーンとして保存します。
PrefabUtility.SaveAsPrefabAssetAndConnect(Environment, "Assets/Prefabs/Environment.prefab", InteractionMode.AutomatedAction);

PrefabUtility.SaveAsPrefabAssetAndConnect(Products, "Assets/Prefabs/Products.prefab", InteractionMode.AutomatedAction);

EditorSceneManager.SaveOpenScenes();
テスト用シーンのテスト
UnityのPlayを使いテスト用シーンのテストを行います。
不具合が見つかった場合はブレイクポイントを使い調査します。
製品用シーンのテスト
ClientSimを使い製品用シーンのテストを行います。
不具合が見つかった場合はInspectorからpublic変数の値を見て調査します。
ローカルVRChatアプリのテスト
VRChat SDKのLocal Testingを使いテストを行います。
この時Number of Clientsに2以上を指定して同期のテストを行います。
不具合が見つかった場合はDebug.LogErrorを使い調査します。
オンラインVRChatアプリのテスト
プライベートパブリッシュを行いテストを行います。
Quest対応を行う場合はここでテストを行います。
バージョン
- Unity : 2019.4.31f1
- VRChat SDK - Worlds : 3.2.3
- UdonSharp : 1.1.9
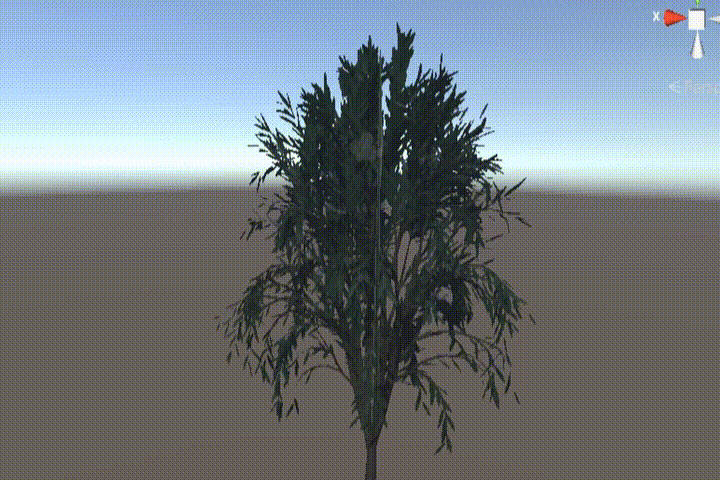
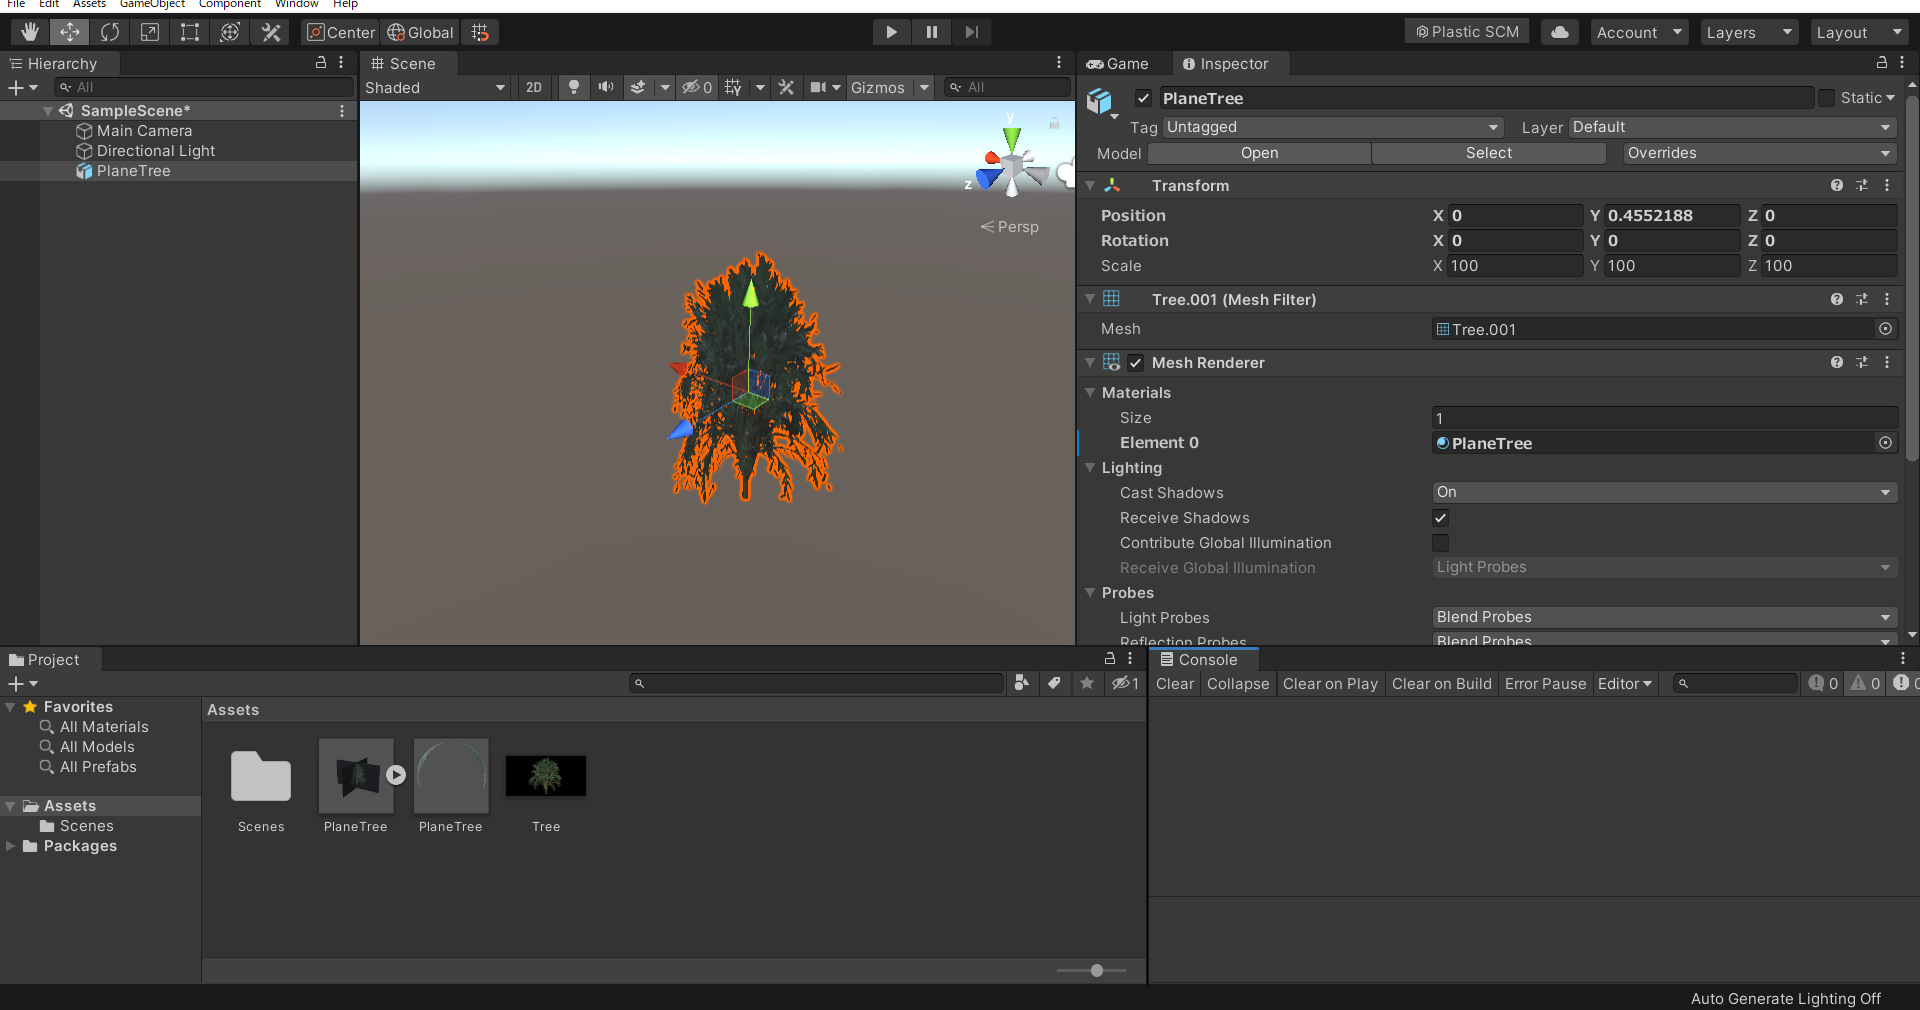
Blenderで板ポリの木を作りUnityで表示する
はじめに
BlenderやUnityでは簡単に木を作ることができますが、
重いという問題点があります。そこで、木を板ポリにすることで
軽くする方法を説明します。
板ポリを十字に配置することで回り込みにもある程度対応します。
手順
Blenderで木を作る
- Edit > Preference > Add-ons から以下を有効にする
- Import Images as Planes
- Sapling Tree Gen
- Node Wrangler
- Shit+A > Curve > Sapling Tree Gen から木を作る
- Settings : Leaves > Show Leaves にチェック
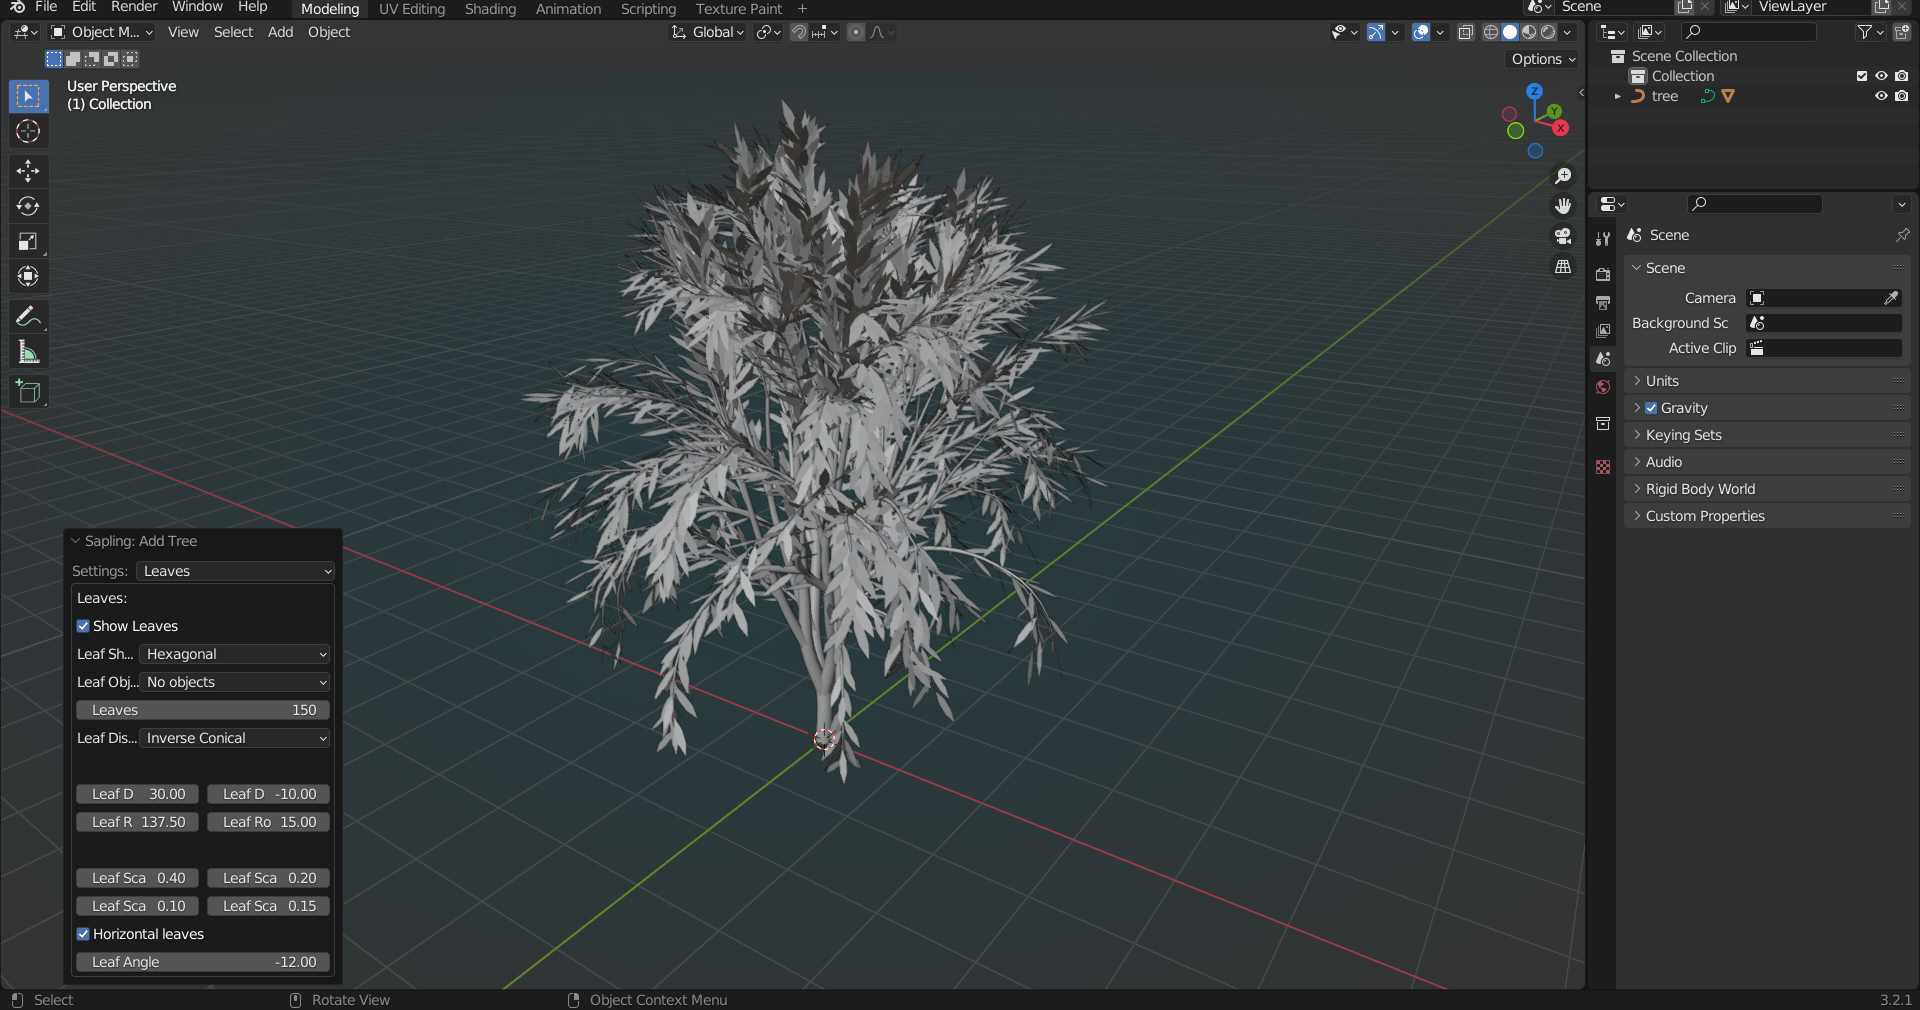
- ambientCGなどで、葉と幹のテクスチャをダウンロードする
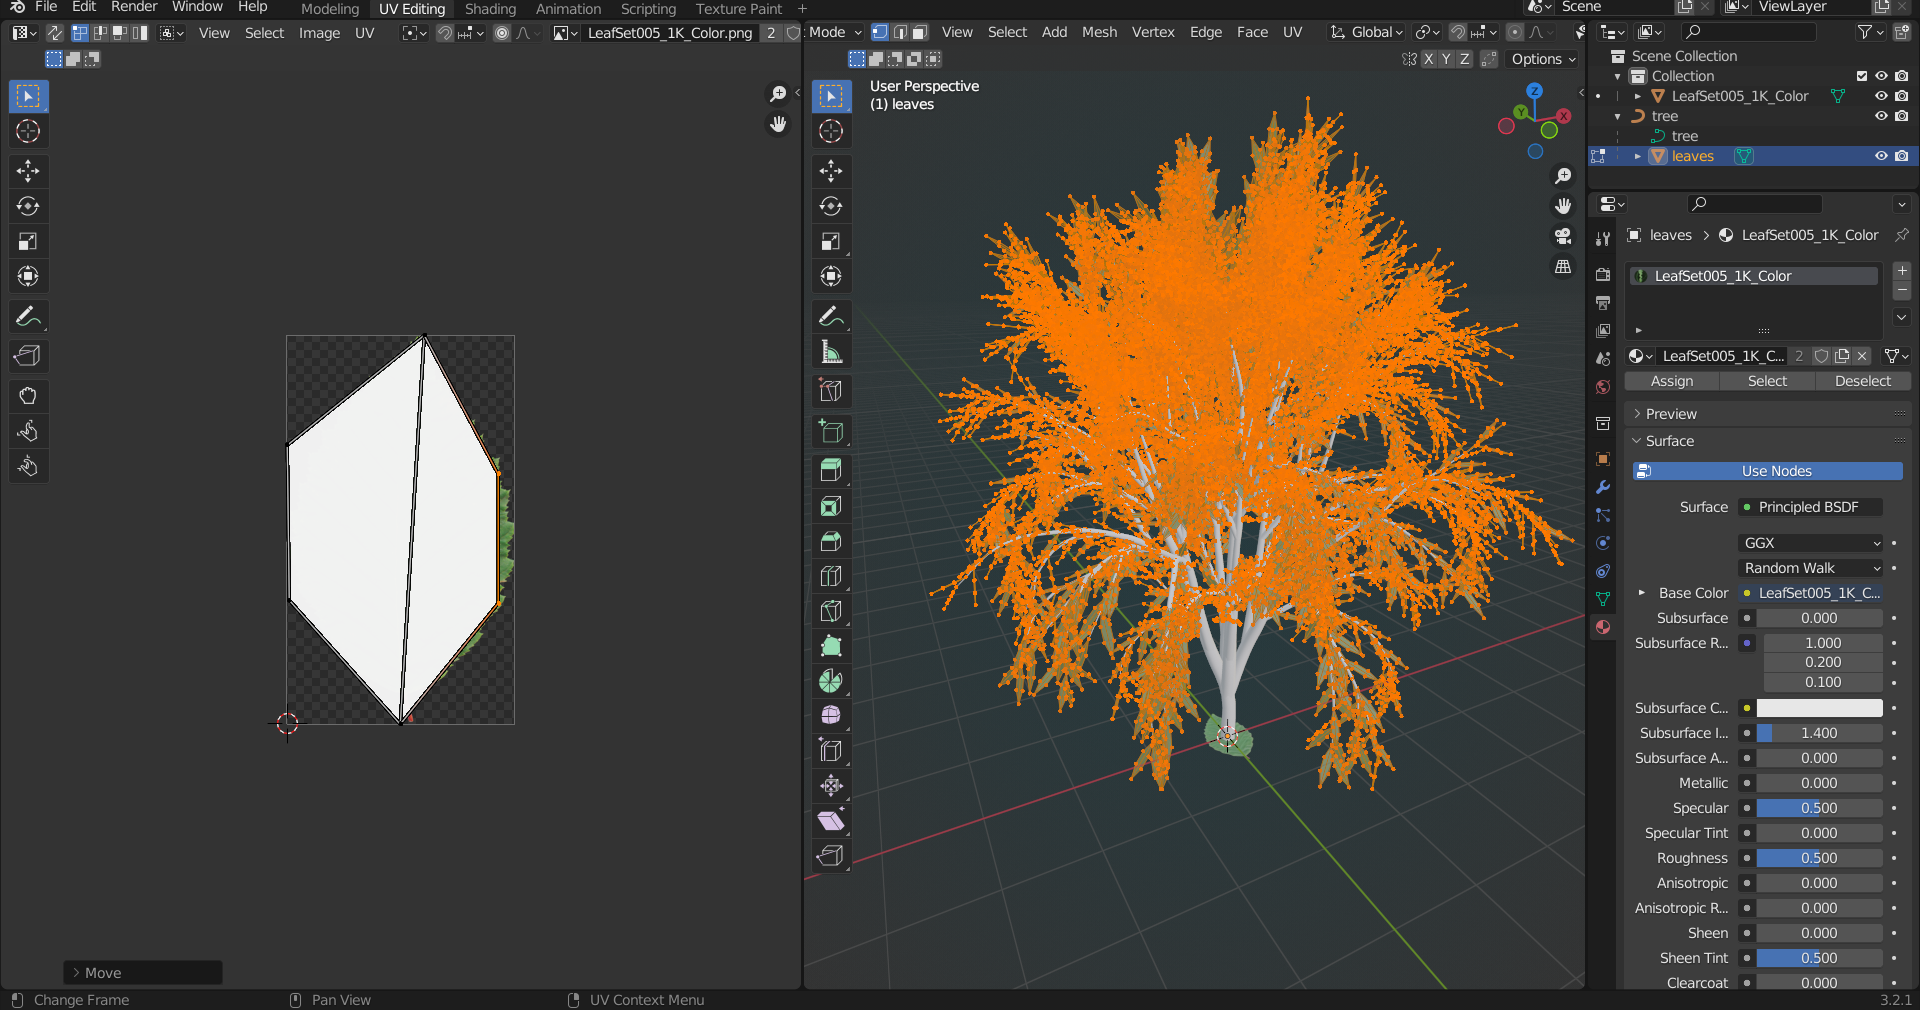
- Shift+A > Image > Images As Planes から葉のテクスチャを選択し葉のマテリアルを作成
- できた葉のPlaneは削除する
- leavesのマテリアルに葉のマテリアルを選択
- UV Editingから葉のUVの形を葉に合わせる
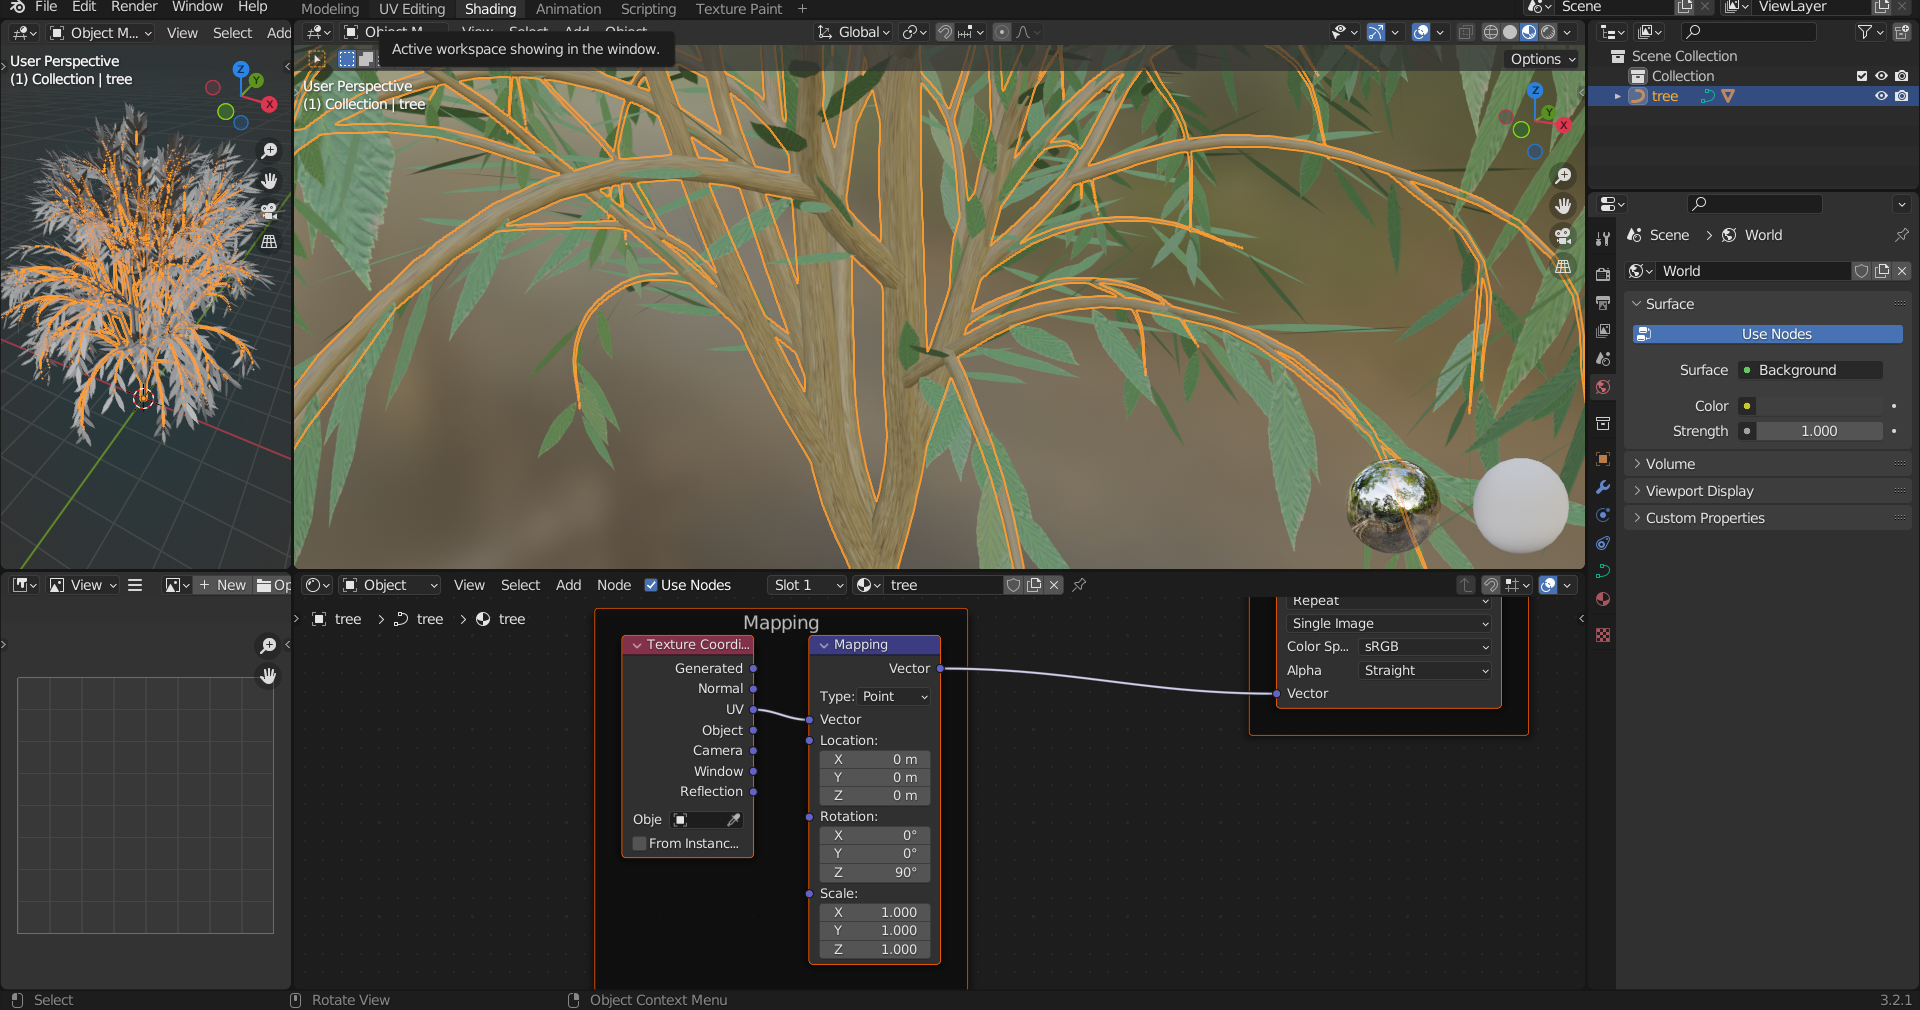
- treeを選択し幹のマテリアルを新規作成
- Shading > Shift+Ctrl+T で幹のテクスチャを選択
- Mapping > Rotation > Z に90°を指定
透過画像として出力する
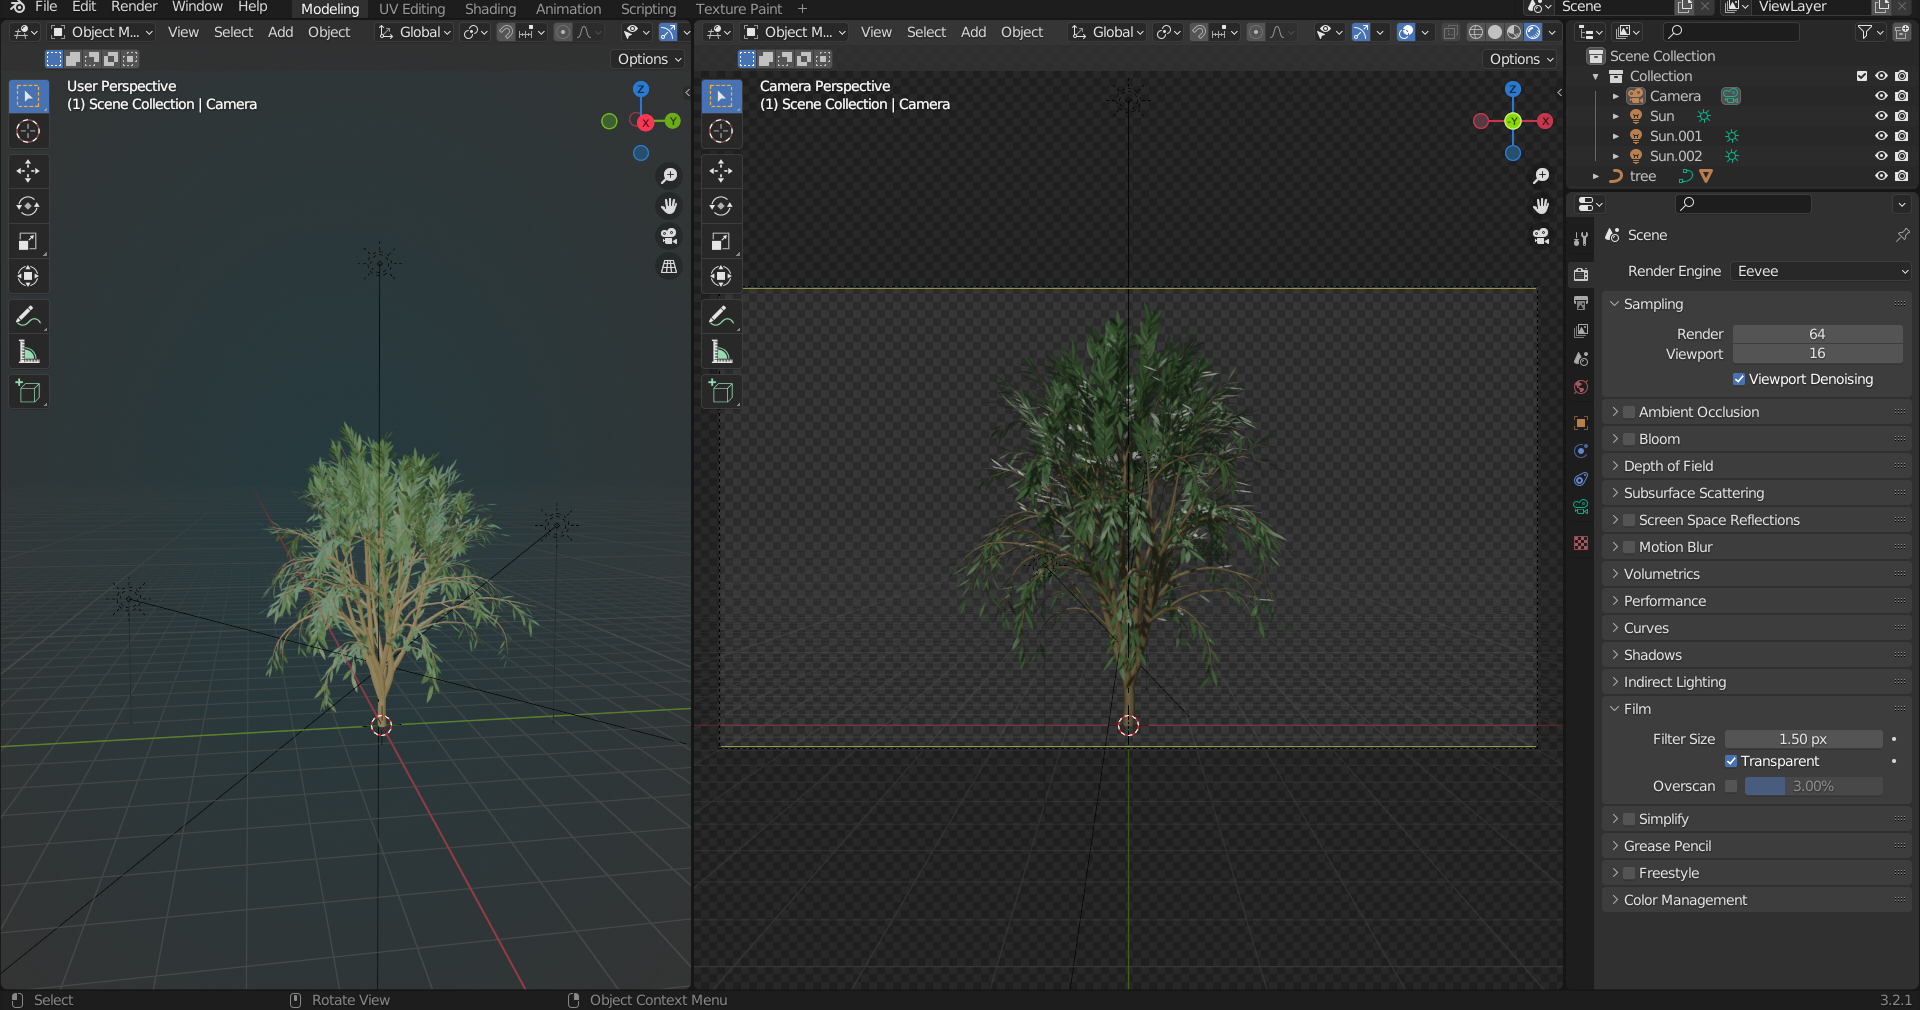
- CameraとLightを追加し位置を調整する
- Render Properties > Film > Transparent にチェック
- Render > Render Image から木のテクスチャ画像を出力
Blenderで板ポリの木を作る
- Shift+A > Image > Images As Planes から木のテクスチャを読み込む
- X軸に90°回転する
- Edit Modeにし、Shit+Dで面を複製、Alt+N > Flipで面を反転し裏面を作る
- Object ModeにしPlaneを複製してZ軸に90°回転し十字に配置する
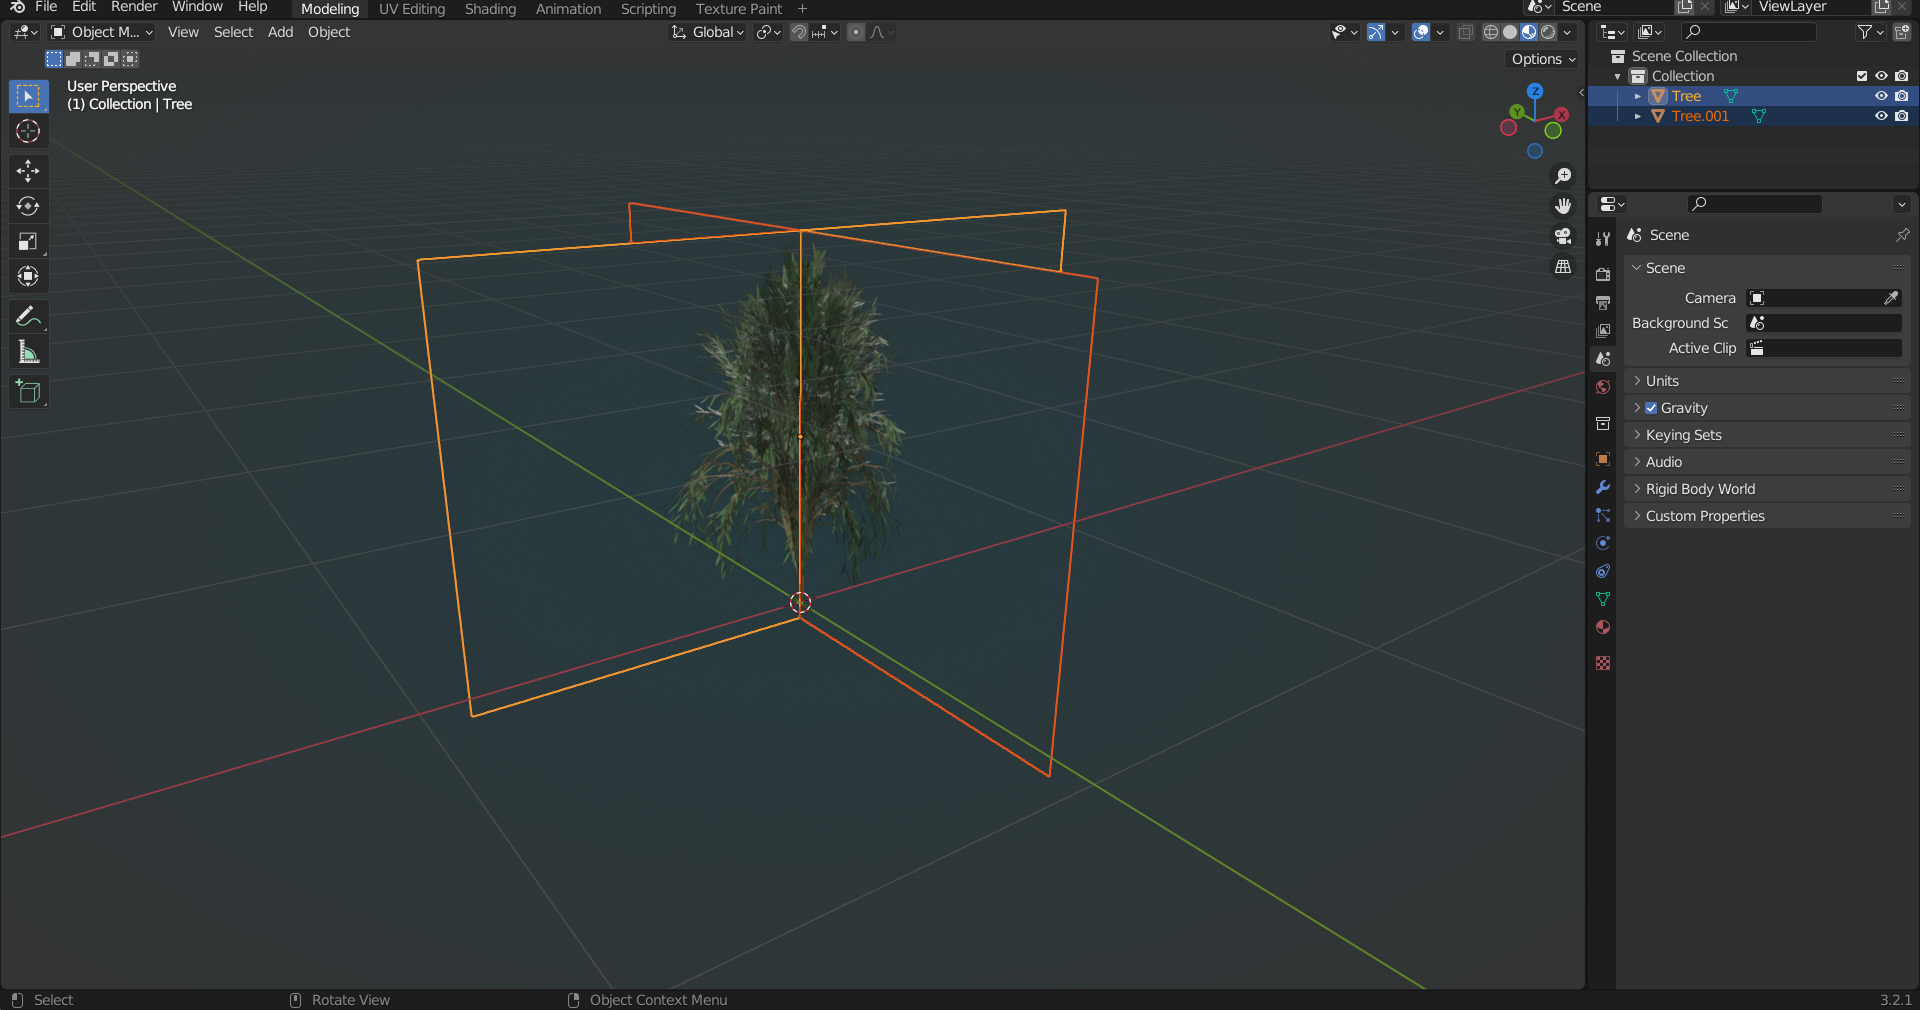
- Ctrl+JでPlane二つを結合する
- File > Export > FBXからFBXで出力する
Unityで読み込み表示する
- 右クリック > Create > Material を選択しマテリアルを作成する
- ShaderをStandardにする
- Rendering ModeをCutoutにし透過するようにする
- Albedoに木のテクスチャを設定する
- FBXをシーンに配置する
- FBXのMaterialsを作成したマテリアルに設定する
参考サイト
バージョン
- Unity : 2019.4.31f1
- Blender : 3.2.1
UnityのRigidbodyでCharacterController風動作を作る
はじめに
UnityのCharacterControllerは便利ですが、
リアルな挙動ができるなどRigidbodyを使う方が自由度が高く
利点がある場合もあります。
そこでRigidbodyを使いCharacterControllerの機能をいくつか実装することで
両方の利点を生かす方法を考えます
方針
- プレイヤーの入力で水平移動・ジャンプ・y軸回転ができるようにする
- 以下機能を実装することで坂を登れる(落ちない)ようにする
ソースコード
using System.Collections;
using System.Collections.Generic;
using UnityEngine;
/// <summary>
/// プレイヤーの入力
/// </summary>
public class PlayerInputs : MonoBehaviour
{
    public float HorizontalAxis = 0;
    public float VerticalAxis = 0;
    public float RotateAxis = 0;
    public bool JumpButton = false;

    private void Update()
    {
        JumpButton = Input.GetButton("Jump");
        HorizontalAxis = Input.GetAxis("Horizontal");
        VerticalAxis = Input.GetAxis("Vertical");
        RotateAxis = GetRotateAxis();
    }

    private float GetRotateAxis()
    {
        float ret = 0;
        if (Input.GetKey(KeyCode.E)) ret = 1;
        else if (Input.GetKey(KeyCode.Q)) ret = -1;
        return ret;
    }
}
using System.Collections;
using System.Collections.Generic;
using UnityEngine;
/// <summary>
/// キャラクターに重力を与える
/// </summary>
public class GravityCharacterController : MonoBehaviour
{
    public float Gravity = -15; // 重力
    public bool IsEnabledGravity; // 重力有効かどうか
    private Rigidbody CharacterRigidbody;
    private void Start()
    {
        CharacterRigidbody = GetComponent<Rigidbody>();
    }
    void FixedUpdate()
    {
        if (IsEnabledGravity)
        {
            CharacterRigidbody.AddForce(0, Gravity, 0, ForceMode.Acceleration);
        }
    }
}
using System.Collections;
using System.Collections.Generic;
using UnityEngine;
/// <summary>
/// プレイヤーの入力をもとにキャラクターを動かす
/// </summary>
public class PlayerCharacterController : MonoBehaviour
{
    public float JumpForce; // ジャンプ力
    public float MoveSpeed; // 水平移動の目標速度
    public float RotateSpeed; // 回転速度
    public float Kp; // P項係数

    public Vector3 Speed;

    PlayerInputs PlayerInputs;
    GroundChecker GroundChecker;
    Rigidbody CharacterRigidbody;

    Vector3 JumpForceVec = Vector3.zero;
    Vector3 MoveDirectionVec = Vector3.zero;
    Vector3 JumpDirectionVec = Vector3.zero;
    Vector3 MoveSpeedErr = Vector3.zero;

    private void Start()
    {
        PlayerInputs = GetComponent<PlayerInputs>();
        CharacterRigidbody = GetComponent<Rigidbody>();
        GroundChecker = GetComponent<GroundChecker>();
    }

    void FixedUpdate()
    {
        Move();
        Jump();
    }

    void Jump()
    {
        if (PlayerInputs.JumpButton && GroundChecker.IsGrounded)
        {
            JumpDirectionVec.x = MoveDirectionVec.x;
            JumpDirectionVec.z = MoveDirectionVec.z;
            JumpDirectionVec.y = 1.0f - (Mathf.Abs(JumpDirectionVec.x) + Mathf.Abs(JumpDirectionVec.z));
            JumpForceVec = JumpDirectionVec * JumpForce;
            CharacterRigidbody.AddForce(JumpForceVec, ForceMode.Impulse);
        }
    }

    void Move()
    {
        MoveDirectionVec = transform.forward * PlayerInputs.VerticalAxis + transform.right * PlayerInputs.HorizontalAxis;
        Vector3 tgtMoveSpeed = MoveDirectionVec * MoveSpeed;
        MoveSpeedErr = tgtMoveSpeed - CharacterRigidbody.velocity;
        MoveSpeedErr.y = 0;
        Vector3 force = MoveSpeedErr * Kp;
        CharacterRigidbody.AddForce(force, ForceMode.Force);
        float rotateSpeed = RotateSpeed * PlayerInputs.RotateAxis;
        CharacterRigidbody.transform.Rotate(0, rotateSpeed * Time.fixedDeltaTime, 0);

        Speed = CharacterRigidbody.velocity;
    }
}
using System.Collections;
using System.Collections.Generic;
using UnityEngine;
/// <summary>
/// キャラクターの当たり判定を行う
/// </summary>
public class CharacterCollider : MonoBehaviour
{
    SlopeChecker SlopeChecker;
    GroundChecker GroundChecker;
    private void Start()
    {
        SlopeChecker = GetComponent<SlopeChecker>();
        GroundChecker = GetComponent<GroundChecker>();
    }
    private void OnCollisionStay(Collision collision)
    {
        Vector3 collidedNormal = collision.contacts[0].normal;

        Vector3 v = Vector3.zero;
        v.x = collidedNormal.x;
        v.z = collidedNormal.z;
        v = v.normalized;
        float cosTheta = Vector3.Dot(collidedNormal, v);

        SlopeChecker.CosTheta = cosTheta;
        GroundChecker.CosTheta = cosTheta;
        SlopeChecker.IsCollided = true;
        GroundChecker.IsCollided = true;
    }
}
using System.Collections;
using System.Collections.Generic;
using UnityEngine;
/// <summary>
/// 坂のチェックを行う
/// </summary>
public class SlopeChecker : MonoBehaviour
{
    public float MinSlopeCos = 0.1f; // 坂と判定する最小のcos
    public float MaxSlopeCos = 0.9f; // 坂と判定する最大のcos
    public float GravityGain = 1e-3f; // 反転重力に掛ける係数
    public bool IsCollided; // 接触しているかどうか
    public float CosTheta; // 接触面の角度cos
    Rigidbody CharacterRigidbody;
    GravityCharacterController GravityCharacterController;
    Vector3 Force;

    private void Start()
    {
        CharacterRigidbody = GetComponent<Rigidbody>();
        GravityCharacterController = GetComponent<GravityCharacterController>();
    }

    void FixedUpdate()
    {
        if (!IsCollided)
        {
            GravityCharacterController.IsEnabledGravity = true;
            return;
        }
        IsCollided = false;

        float absCosTheta = Mathf.Abs(CosTheta);
        if ((absCosTheta >= MinSlopeCos) && (absCosTheta <= MaxSlopeCos))
        {
            Force.y = -GravityCharacterController.Gravity * GravityGain;
            CharacterRigidbody.AddForce(Force, ForceMode.Acceleration);
            GravityCharacterController.IsEnabledGravity = false;
        }
        else
        {
            GravityCharacterController.IsEnabledGravity = true;
        }
    }
}
using System.Collections;
using System.Collections.Generic;
using UnityEngine;
/// <summary>
/// 地面のチェックを行う
/// </summary>
public class GroundChecker : MonoBehaviour
{
    public float MaxGroundCos = 0.5f; // 地面と判定する最大のcos
    public bool IsCollided; // 接触しているかどうか
    public float CosTheta; // 接触面の角度cos
    public bool IsGrounded; // 地面に接触しているかどうか

    void FixedUpdate()
    {
        if (!IsCollided)
        {
            IsGrounded = false;
            return;
        }
        IsCollided = false;
        float absCosTheta = Mathf.Abs(CosTheta);
        if (absCosTheta <= MaxGroundCos) IsGrounded = true;
        else IsGrounded = false;
    }
}
Unityプロジェクトは以下にあります
https://github.com/hide00310/Unity_RigidbodyCharacterController
バージョン
Unity : 2019.4.31f1
UnityでRigidbodyを使いホーミング弾を作る
はじめに
Unityで3Dホーミング弾を作ります。
Rigidbodyを使いリアルな挙動を目指します。
方針
- Rigidbody.AddForce、ForceMode.Forceを使う
- ターゲットの方向に力を与える
- PIDを使い速度が一定になるように制御を行う
- 力は最大値以上にならないようにする
ソースコード
using System.Collections;
using System.Collections.Generic;
using UnityEngine;

public class RigidbodyHoming : MonoBehaviour
{
    public Transform TgtTransform;
    public Rigidbody HomingRigidbody;

    public float Speed; // 追従速度
    public float MaxForce; // 最大の力
    public float Kp; // P項係数
    public float Ki; // I項係数
    public float Kd; // D項係数

    Vector3 SpeedErrInteg;
    Vector3 PresentSpeedErr;

    private void FixedUpdate()
    {
        float dt = Time.fixedDeltaTime;
        Vector3 tgtPos = TgtTransform.position;
        Vector3 diffDir = (tgtPos - transform.position).normalized; // ターゲットの方向
        Vector3 tgtSpeed = diffDir * Speed;
        Vector3 speedErr = tgtSpeed - HomingRigidbody.velocity;
        SpeedErrInteg += speedErr * dt;
        Vector3 prevSpeedErr = PresentSpeedErr;
        PresentSpeedErr = speedErr;
        Vector3 speedErrDiff = (PresentSpeedErr - prevSpeedErr) / dt;
        Vector3 force = Kp * speedErr + Ki * SpeedErrInteg + Kd * speedErrDiff; // PID制御
        float forceMagnitude = force.magnitude;
        if (forceMagnitude > MaxForce)
        {
            force = force / forceMagnitude * MaxForce; // 力を最大値にする
        }

        HomingRigidbody.AddForce(force, ForceMode.Force);
    }
}
Unityプロジェクトは以下にあります
https://github.com/hide00310/RigidbodyHoming/
バージョン
Unity : 2019.4.31f1
Unityで高度計を作る
はじめに
Unityで飛行機のコックピット風の高度計を作る方法を説明します
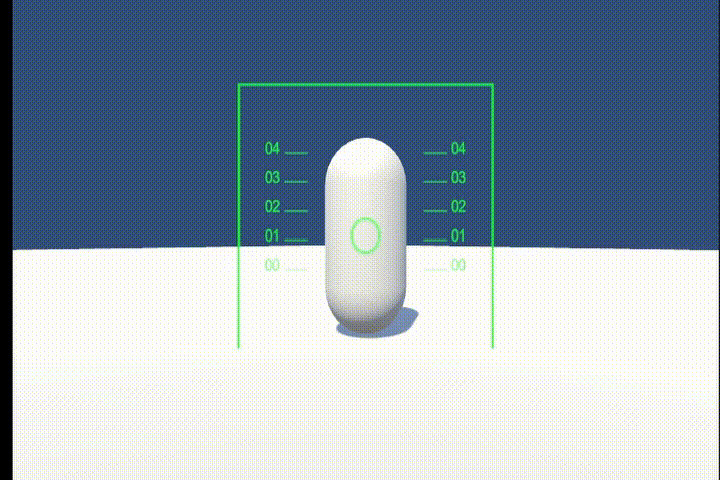
考え方

高度20mをステップ0、高度25mをステップ1のように
高度をステップで表します。
求めるのはキャンバス0地点から現在のステップまでのステップ
transStepです。
- presentStep : 現在のステップ
- presentPos : 現在のステップの高度
- pos : 現在高度
- transStep : キャンバス0地点から現在のステップまでのステップ
- transPos : キャンバス0地点から現在のステップまでの高度
- stepPos : 1ステップの高度

コード
using System.Collections;
using System.Collections.Generic;
using UnityEngine;

public class Altimeter : MonoBehaviour
{
    public float StepPos;
    public float PosToCanvasUnit;
    public AltimeterNeedle[] Needles;
    public Rigidbody CharacterRigidbody;

    private void Update()
    {
        float pos = CharacterRigidbody.transform.position.y;
        for (int i = 0; i < Needles.Length; i++)
        {
            float transStep = GetTranslationStep(pos, StepPos, i - Needles.Length / 2);
            AltimeterNeedle needle = Needles[i];
            needle.transform.position = transform.position;
            needle.transform.Translate(0, transStep * PosToCanvasUnit, 0);
            string num = ((int)Mathf.Abs(pos / StepPos) + i).ToString("00");
            needle.Texts[0].text = num;
            needle.Texts[1].text = num;
        }
    }
    private float GetTranslationStep(float pos, float stepPos, int presentStep)
    {
        float presentPos = stepPos * (int)(pos / stepPos);
        float diffPos = presentPos - pos;
        float transPos = diffPos + stepPos * presentStep;
        return transPos / stepPos;
    }
}
using System.Collections;
using System.Collections.Generic;
using UnityEngine;
using UnityEngine.UI;

public class AltimeterNeedle : MonoBehaviour
{
    public Text[] Texts;
}
Unityプロジェクトは以下にあります。
https://github.com/hide00310/Unity_Altimeter