yu00’s blog

プログラミングに関する備忘録です

MarkdownでTex数式をSVGに変換する(Pandoc+MathJax+Python Selenium)

はじめに

Markdown中のTex数式は、Webサイトによってサポートされていなかったり、
方言があったりします。
また、JavaScriptTex数式変換ツールであるMathJaxがありますが、
レンダリングが遅いという問題があります。
そこで、Tex数式をMathJaxを使い事前にSVG画像に変換することで、
汎用的かつ高速なレンダリングを目指します。

環境構築

https://yu00.hatenablog.com/entry/2022/07/07/133441

方針

以下のようなPython Pandoc filterを作成します。

  • Markdownの中からMath要素だけを抜き出す
  • Math要素テキストだけを書き出したMathJax記法の
    テンポラリHTMLファイルを作成
  • Seleniumで テンポラリHTMLファイルを開きMathJaxでコンパイル
  • コンパイルしたSVG Math要素を取得
  • PandocのMath要素をSVG要素に変換

ソース

import panflute as pf
import chromedriver_binary
from selenium import webdriver
from selenium.webdriver.chrome.options import Options
from string import Template
import os

class MathConverter:
    TMP_HTML_FILE_NAME = os.path.abspath('tmp.html')
    "テンポラリHTMLファイル名"

    MATH_JAX_CNFIG = '''{
        "tex2jax":{
            "inlineMath":[["$","$"]],
            "displayMath":[["$$","$$"]]
        },
    }'''
    "MathJax 設定"

    MATH_JAX_CDN_URL = 'https://cdnjs.cloudflare.com/ajax/libs/mathjax/2.7.5/MathJax.js?config=TeX-AMS_SVG'
    "MathJax CDN URL"

    SELENIUM_WAIT_TIME = 5
    "Seleniumで要素検索の最大待ち時間"

    MATH_CLASS_NAME = 'my-math-class'
    MATH_JAX_END_CLASS_NAME = 'math-jax-end'
    class MathElemId:
        """Pandoc JSON ASTとSVGのMath要素対応付けのためのID"""
        def __init__(self):
            self._id = 0
        def get(self):
            return f'my-math-id-{self._id}'
        def __iadd__(self, b):
            self._id += b
            return self

    def __init__(self):
        self._math_elems = [] 
        "Pandoc JSON ASTのMath要素"
        
        self._svg_math_htmls = {}
        "dict[MathElemId, svg_html]"

        self._svg_src_html = ''
        "SVGソースHTML"

        self._pf_id_to_math_elem_id = {}
        "dict[id(pf.Math), MathElemId]"

        self._math_elem_id = self.MathElemId()

    def prepare(self, doc):
        doc.walk(self._collect_pandoc_math_elems)
        self._create_tmp_html_file()
        self._compile_tmp_html_to_svg()

    def action(self, elem, doc):        
        if isinstance(elem, pf.Para):
            # Math要素が<p>の子かつDisplayMathの場合は<p>ごと<svg>に書き換え
            if len(elem.content) == 1 and isinstance(elem.content[0], pf.Math) and elem.content[0].format=='DisplayMath':
                return self._convert_pandoc_math_to_svg(elem.content[0])
        elif isinstance(elem, pf.Math):
            if not isinstance(elem.parent, pf.Para) or elem.format!='DisplayMath':
                # <span> or plain <div>
                return self._convert_pandoc_math_to_svg(elem)

    def finalize(self, doc):
        # SVGソースをbodyの最初に追加
        doc.content.insert(0, pf.RawBlock(f'<div hidden>{self._svg_src_html}</div>', 'html'))

    def _collect_pandoc_math_elems(self, elem, doc):
        """
        Pandoc JSON ASTからMath要素だけを抜き出す
        """
        if isinstance(elem, pf.Math):
            self._math_elems += [{'text':elem.text, 'format':elem.format, 'id':self._math_elem_id.get()}]
            self._pf_id_to_math_elem_id[id(elem)] = self._math_elem_id.get()
            self._math_elem_id += 1

    def _create_tmp_html_file(self):
        """
        Math要素テキストだけを書き出したMathJax記法のテンポラリHTMLファイルを作成
        """

        # StartupHook : MathJaxコンパイルが終了した時にdiv要素を作成する関数を登録
        html_template = Template('''<html><head>
        <meta charset="utf-8">
        <script type="text/x-mathjax-config">
        MathJax.Hub.Config($math_jax_config)
        MathJax.Hub.Register.StartupHook("End",function () {
            const elem = document.createElement('div');
            elem.className = '$math_jax_end_class_name';
            document.body.prepend(elem);
        });
        </script>
        <script type="text/javascript" id="MathJax-script" async src="$cdn_url"></script>
        </head>
        <body>$body</body>
        </body></html>''')

        # Math要素テキストを「$」と「div」で囲った文字列を作成
        body = ''
        for math_elem in self._math_elems:
            math_delim = '$$' if math_elem['format'] == 'DisplayMath' else '$'
            body += f'<div class="{self.MATH_CLASS_NAME}" id="{math_elem["id"]}" format="{math_elem["format"]}">{math_delim}{math_elem["text"]}{math_delim}</div>'
        
        # HTML書き出し
        with open(self.TMP_HTML_FILE_NAME, 'w', encoding='utf-8') as f:
            f.write(html_template.substitute(
                body=body, 
                cdn_url=self.MATH_JAX_CDN_URL, 
                math_jax_config=self.MATH_JAX_CNFIG,
                math_jax_end_class_name=self.MATH_JAX_END_CLASS_NAME
                ))

    def _compile_tmp_html_to_svg(self):
        """
        テンポラリHTMLファイルを開きコンパイル済みのSVG Math要素を取得
        """

        options = Options()
        options.add_argument('--headless')
        driver = webdriver.Chrome(options=options)
        driver.implicitly_wait(self.SELENIUM_WAIT_TIME)

        # テンポラリHTMLファイルを開く
        driver.get('file:///'+self.TMP_HTML_FILE_NAME.replace('\\', '/'))
        # MathJaxのコンパイル終了待ち
        x = driver.find_element_by_class_name(self.MATH_JAX_END_CLASS_NAME)
        assert x, 'Error MathJax is not End'
        
        # bodyの最初にあるSVGのソースを取得
        self._svg_src_html = driver.find_element_by_tag_name('svg').get_attribute('outerHTML')
        
        # 各SVG Math要素を取得
        elems = driver.find_elements_by_class_name(self.MATH_CLASS_NAME)
        for elem in elems:
            tag = 'div' if elem.get_attribute('format')=='DisplayMath' else 'span'
            svg_math_html = elem.find_element_by_tag_name('svg').get_attribute('outerHTML')
            math_elem_id = elem.get_attribute('id')
            self._svg_math_htmls[math_elem_id] = f'<{tag} class="{self.MATH_CLASS_NAME}" id="{math_elem_id}">{svg_math_html}</{tag}>'

    def _convert_pandoc_math_to_svg(self, math_elem):
        """
        Pandoc JSON ASTのMath要素をSVG要素に変換
        """
        svg_math_html = self._svg_math_htmls[self._pf_id_to_math_elem_id[id(math_elem)]]
        if math_elem.format=='DisplayMath':
            ret = pf.RawBlock(svg_math_html, 'html')
        else:
            ret = pf.RawInline(svg_math_html, 'html')
        return ret

x = MathConverter()
pf.run_filter(x.action, prepare=x.prepare, finalize=x.finalize)

サンプル

以下のようなマークダウンを作成します。

$$
\newcommand{\mat}[1]{\begin{bmatrix}#1\end{bmatrix}}
$$

$$
\boldsymbol{E} = \mat{1 & 0 & 0\\ 0 & 1 & 0\\ 0 & 0 & 1}
$$

+ $\boldsymbol{E}$ : 単位行列

MarkdownからHTMLに変換

以下コマンドを実行します。
pandoc -s src.md -o dst.html --filter filter.py

実行結果

MarkdownからMarkdownに変換

以下コマンドを実行します。

pandoc -s src.md -o dst.md --to=markdown-raw_attribute --wrap=none --filter filter.py

実行結果

<div hidden><svg><defs id="MathJax_SVG_glyphs"><path stroke-width="1" id="MJMATHBI-45" d="M257 618H231Q198 618 198 636Q202 672 214 678L219 680H811Q817 677 820 673T824 666L825 664Q825 659 814 549T799 433Q793 424 771 424Q752 424 746 427T740 441Q740 445 742 466T744 505Q744 561 722 585T646 616Q639 617 545 618H456Q456 617 427 502T398 385Q398 384 435 384Q461 385 471 385T499 391T526 405T545 433T562 478Q566 494 571 497T595 501H604Q622 501 626 486Q626 482 593 349T557 213Q552 205 530 205Q499 205 499 219Q499 222 503 242T508 281Q508 308 491 314T429 322Q425 322 423 322H382L317 64Q317 62 390 62Q460 62 493 64T569 80T640 124Q665 149 686 187T719 253T733 283Q739 289 760 289Q791 289 791 274Q791 267 763 201T706 71L678 8Q676 4 667 0H58Q47 5 43 15Q47 54 60 60Q64 62 113 62H162L163 66Q163 67 231 341T301 616Q301 618 257 618Z"></path><path stroke-width="1" id="MJMAIN-3D" d="M56 347Q56 360 70 367H707Q722 359 722 347Q722 336 708 328L390 327H72Q56 332 56 347ZM56 153Q56 168 72 173H708Q722 163 722 153Q722 140 707 133H70Q56 140 56 153Z"></path><path stroke-width="1" id="MJMAIN-5B" d="M118 -250V750H255V710H158V-210H255V-250H118Z"></path><path stroke-width="1" id="MJMAIN-31" d="M213 578L200 573Q186 568 160 563T102 556H83V602H102Q149 604 189 617T245 641T273 663Q275 666 285 666Q294 666 302 660V361L303 61Q310 54 315 52T339 48T401 46H427V0H416Q395 3 257 3Q121 3 100 0H88V46H114Q136 46 152 46T177 47T193 50T201 52T207 57T213 61V578Z"></path><path stroke-width="1" id="MJMAIN-30" d="M96 585Q152 666 249 666Q297 666 345 640T423 548Q460 465 460 320Q460 165 417 83Q397 41 362 16T301 -15T250 -22Q224 -22 198 -16T137 16T82 83Q39 165 39 320Q39 494 96 585ZM321 597Q291 629 250 629Q208 629 178 597Q153 571 145 525T137 333Q137 175 145 125T181 46Q209 16 250 16Q290 16 318 46Q347 76 354 130T362 333Q362 478 354 524T321 597Z"></path><path stroke-width="1" id="MJMAIN-5D" d="M22 710V750H159V-250H22V-210H119V710H22Z"></path><path stroke-width="1" id="MJSZ4-23A1" d="M319 -645V1154H666V1070H403V-645H319Z"></path><path stroke-width="1" id="MJSZ4-23A3" d="M319 -644V1155H403V-560H666V-644H319Z"></path><path stroke-width="1" id="MJSZ4-23A2" d="M319 0V602H403V0H319Z"></path><path stroke-width="1" id="MJSZ4-23A4" d="M0 1070V1154H347V-645H263V1070H0Z"></path><path stroke-width="1" id="MJSZ4-23A6" d="M263 -560V1155H347V-644H0V-560H263Z"></path><path stroke-width="1" id="MJSZ4-23A5" d="M263 0V602H347V0H263Z"></path></defs></svg></div>
<div class="my-math-class" id="my-math-id-0"><svg xmlns:xlink="http://www.w3.org/1999/xlink" width="0" height="0.289ex" viewBox="0 -62.2 0 124.4" role="img" focusable="false" style="vertical-align: -0.145ex;" aria-hidden="true"><g stroke="currentColor" fill="currentColor" stroke-width="0" transform="matrix(1 0 0 -1 0 0)"></g></svg></div>
<div class="my-math-class" id="my-math-id-1"><svg xmlns:xlink="http://www.w3.org/1999/xlink" width="16.996ex" height="9.24ex" viewBox="0 -2230 7317.6 3978.3" role="img" focusable="false" style="vertical-align: -4.061ex;" aria-hidden="true"><g stroke="currentColor" fill="currentColor" stroke-width="0" transform="matrix(1 0 0 -1 0 0)"><use xlink:href="#MJMATHBI-45" x="0" y="0"></use><use xlink:href="#MJMAIN-3D" x="1103" y="0"></use><g transform="translate(2159,0)"><g transform="translate(0,2150)"><use xlink:href="#MJSZ4-23A1" x="0" y="-1155"></use><g transform="translate(0,-2048.5066225165565) scale(1,0.49337748344370863)"><use xlink:href="#MJSZ4-23A2"></use></g><use xlink:href="#MJSZ4-23A3" x="0" y="-3155"></use></g><g transform="translate(834,0)"><g transform="translate(-13,0)"><use xlink:href="#MJMAIN-31" x="0" y="1350"></use><use xlink:href="#MJMAIN-30" x="0" y="-50"></use><use xlink:href="#MJMAIN-30" x="0" y="-1450"></use></g><g transform="translate(1488,0)"><use xlink:href="#MJMAIN-30" x="0" y="1350"></use><use xlink:href="#MJMAIN-31" x="0" y="-50"></use><use xlink:href="#MJMAIN-30" x="0" y="-1450"></use></g><g transform="translate(2988,0)"><use xlink:href="#MJMAIN-30" x="0" y="1350"></use><use xlink:href="#MJMAIN-30" x="0" y="-50"></use><use xlink:href="#MJMAIN-31" x="0" y="-1450"></use></g></g><g transform="translate(4490,2150)"><use xlink:href="#MJSZ4-23A4" x="0" y="-1155"></use><g transform="translate(0,-2048.5066225165565) scale(1,0.49337748344370863)"><use xlink:href="#MJSZ4-23A5"></use></g><use xlink:href="#MJSZ4-23A6" x="0" y="-3155"></use></g></g></g></svg></div>

-   <span class="my-math-class" id="my-math-id-2"><svg xmlns:xlink="http://www.w3.org/1999/xlink" width="1.917ex" height="2.107ex" viewBox="0 -784.8 825.5 907.3" role="img" focusable="false" style="vertical-align: -0.284ex;" aria-hidden="true"><g stroke="currentColor" fill="currentColor" stroke-width="0" transform="matrix(1 0 0 -1 0 0)"><use xlink:href="#MJMATHBI-45" x="0" y="0"></use></g></svg></span> : 単位行列


Powered by MathJax

This page is based on MathJax technology.

Pandoc+Python環境構築まとめ

はじめに

PandocはMarkdownからHTML変換など、マークアップ言語を
別の形式に変換するツールです。
また、Pandoc filterという仕組みを使用することで、
変換書式を自作することができます。
ここでは、PandocとPython Pandoc filterを
使用するための環境構築方法を説明します。
環境はWindows+Python Anaconda(Miniconda)で説明します。

インストールと設定

Miniconda

MinicondaはPythonの実行環境+パッケージ管理ツールです。
同様のツールAnacondaと比べ必要最小限のパッケージのみ
含まれるため、容量が少ない&軽いという利点があります。

公式ホームページ
から自身のOSにあったバージョンをダウンロードしてインストールします。

Minicondaの起動方法
  • Windowsのタスクバーからanacondaを検索して「Anaconda Prompt」を実行

Pandoc & Panflute

Pandocと、PythonのPandoc filterであるpanfluteをインストールします。
Pandocとpanfluteにはバージョンに依存関係があるため、同時にインストールします。

  • Anaconda Promptを起動
  • 以下コマンドを実行
    • conda install -c conda-forge pandoc panflute
文字コード設定

Pandocでは文字コードUTF-8で扱うため、Python文字コードUTF-8にします。

  • Anaconda Promptを起動
  • 以下コマンドを実行
    • conda env config vars set PYTHONUTF8=1

Selenium(オプション)

SeleniumはWebページ実行のためのツールです。
Pandoc filterでは基本必要になりませんが、
JavaScriptを実行する時に必要になることがあります。
ここではChromeブラウザでのインストール方法を説明します。

  • 「Chrom>設定>Chromeについて」からバージョンを確認(ここではX.X.Xとする)
  • Anaconda Promptを起動
  • 以下コマンドを実行
    • conda install -c conda-forge selenium python-chromedriver-binary=X.X.X

(Chromeバージョンの上3桁まで同じなら問題ないかとは思いますが、もし問題あればconda search -c conda-forge python-chromedriver-binaryで検索して近いバージョンをインストールしてください)

サンプル

ソース

ソースとして以下のようなマークダウンを用意します

# ヘッダ1
テスト

## ヘッダ2
テスト

### ヘッダ3
テスト

Pandoc filterとして、すべてのヘッダの先頭に「😀」を追加するコードを作成してみます。

import panflute as pf

def action(elem, doc):
    if isinstance(elem, pf.Header):
        elem.content.insert(0, pf.Str('😀'))

pf.run_filter(action)

変換方法

マークダウンをHTMLに変換します。

選択肢1 : Anaconda Prompt
  • Anaconda Promptを起動
  • cdコマンドでsrc.mdがあるフォルダに移動
  • 以下コマンドを実行
    • pandoc -s src.md -o dst.html --filter filter.py
選択肢2 : バッチファイル
  • Anaconda Promptを起動
  • where condaでconda.batのパスを調べる(ここではX\X\Xとする)
  • 以下のようなバッチファイルを作成
call X\X\X\conda.bat activate
pandoc -s src.md -o dst.html --filter filter.py
  • run_pandoc.batをダブルクリックして実行

生成されたHTMLファイル

<!DOCTYPE html>
<html xmlns="http://www.w3.org/1999/xhtml" lang="" xml:lang="">
<head>
  (略)
</head>
<body>
<h1 id="ヘッダ1">😀ヘッダ1</h1>
<p>テスト</p>
<h2 id="ヘッダ2">😀ヘッダ2</h2>
<p>テスト</p>
<h2 id="ヘッダ3">😀ヘッダ3</h2>
<p>テスト</p>
</body>
</html>

リファレンスリンク

スタイルシート詳細

PyQt5入門 PythonでGUI作成 - yu00’s blog


スタイルシートについて詳細を説明します.

スタイルシートの設定

アプリケーション全体に同じスタイルを設定するには
QApplication.setStyleSheet(),
特定のウィジェットとその子ウィジェットにスタイルを
設定するにはQWidget.setStyleSheet()を使います.

次はアプリケーション全体のQPushButtonの
文字色を赤にする例です.

#! /usr/bin/python3
# -*- coding: utf-8 -*-

import sys
from PyQt5.QtWidgets import QApplication, QWidget, QPushButton

if __name__ == '__main__':
    app = QApplication(sys.argv)
    
    style = 'QPushButton{color: red}'
    app.setStyleSheet(style)
    
    window = QWidget()
    
    button = QPushButton('button', window)
    
    window.show()
    sys.exit(app.exec_())

f:id:yu00:20150919205252p:plain

スタイルの書き方

スタイルはselector, property, valueを指定します.

    # selector{property: value}
    style = 'QPushButton{color: red}'


複数のクラスに同じ設定をしたいときは,
コンマ(,)で区切ります.

    style = 'QPushButton, QLabel{color: red}'


クラスごとに設定するには次のようにします.

    style = '''
        QPushButton{color: red}
        QLabel{color: blue}
        '''


複数のプロパティを設定するには
セミコロン(;)で区切ります.

    style = '''
        QPushButton{
            color: red;
            font-size: 15pt;
        }
        '''

スタイルを適用する範囲を指定

セレクターでスタイルを適用する範囲を指定できます.

    # すべてのウィジェット
    style = '*{color: red}'
    
    # QPushButtonとその派生クラスのインスタンス
    style = 'QPushButton{color: red}'
    
    # (QPushButton.flat==false)となるインスタンス
    style = 'QPushButton[flat="false"]{color: red}'
    
    # QPushButtonのインスタンスのみ.派生クラスは適用しない
    style = '.QPushButton{color: red}'
    
    # QPushuButtonでobject nameがmyButtonとなるインスタンス
    style = 'QPushButton#myButton{color: red}'
    button = QPushButton('button')
    button.setObjectName('myButton')
    
    # QDialogの子孫(子,孫...)のQPushButtonのインスタンス
    style = 'QDialog QPushButton{color: red}'
    
    # QDialogの子のQPushButtonのインスタンス
    style = 'QDialog > QPushButton{color: red}'

セレクターの組み合わせ

セレクタを組み合わせて使うことができます.

    # object nameがmyWidgetの子のウィジェットすべて
    style = 'QWidget#myWidget > *{color: red}'

Sub-Controls

ウィジェットによっては,サブコントロールを持つ
ものもあります.
サブコントロールのスタイルはコロンコロン(::)で指定します.
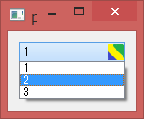
例えばQComboBoxのサブコントロールに
下ボタンがあります.
f:id:yu00:20150921115642p:plain
QComboBoxの下ボタンはdrop-downで指定します.

    style = 'QComboBox::drop-down{image: url(my-drop-down.png)}'

f:id:yu00:20150921115807p:plain

Pseudo-States

ウィジェットによっては,pseudo-states(疑似状態)を持つものが
あります.
pseudo-statesはコロン(:)で指定します.
例えばQPushBottonのpseudo-statesに
マウスのカーソルが乗っている状態があります.
マウスのカーソルが乗っている状態はhoverで指定します.

    style = 'QPushButton:hover{color: red}'

f:id:yu00:20150921135344p:plain


エクスクラメーション(!)はNOTを表します.
次は,マウスが乗っていないとき文字色が赤になります.

    style = 'QPushButton:!hover{color: red}'


pseudo-statesをつなげるとANDになります.
次は,マウスが乗っているかつ押されているときに文字色が赤になります.

    style = 'QPushButton:hover:pressed{color: red}'


コンマ(,)はORを表します.

    style = 'QPushButton:hover, QPushButton:pressed{color: red}'


また,サブコントロールと一緒に使うこともできます.

    style = 'QComboBox::drop-down:hover{image: url(my-drop-down.png)}'

自作クラスのスタイルシート

セレクタに自作のクラスを指定できます.

class MyButton(QPushButton):
    ...

...
    style = 'MyButton{color: red}'

スタイルシートによるスタイル設定

PyQt5入門 PythonでGUI作成 - yu00’s blog

スタイルシート

PyQt5でフォントや色を設定するにはスタイルシート
を使うと簡単です.

スタイルシートはHTML CSSのような形式でスタイルを
設定する機能です.

スタイルシートを使うことで,
アプリケーション全体に同じスタイルを使うことや,
クラスごと,インスタンスごとにスタイルを設定することも
できます.

スタイルシートの例

QWidget.setStyleSheet()を使うことで,
インスタンスごとにスタイルを設定できます.

#! /usr/bin/python3
# -*- coding: utf-8 -*-

import sys
from PyQt5.QtWidgets import QApplication, QWidget, QPushButton

if __name__ == '__main__':
    app = QApplication(sys.argv)
    
    window = QWidget()
    
    button = QPushButton('button', window)
    # スタイルシートを設定.文字色を赤にする
    button.setStyleSheet('color:red')
    
    window.show()
    sys.exit(app.exec_())

f:id:yu00:20150919205252p:plain

QGridLayoutクラス

PyQt5入門 PythonでGUI作成 - yu00’s blog

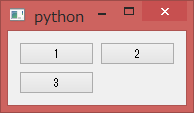
QGridLayoutクラスはマス目に並べるクラスです.

マス目に並べる

addWidget(widget, row, column)

#! /usr/bin/python3
# -*- coding: utf-8 -*-

import sys
from PyQt5.QtWidgets import QApplication, QWidget, QPushButton, QGridLayout

if __name__ == '__main__':
    app = QApplication(sys.argv)
    window = QWidget()
    
    button1 = QPushButton('1')
    button2 = QPushButton('2')
    button3 = QPushButton('3')
    
    layout = QGridLayout()
    # レイアウトにウィジェットを追加
    layout.addWidget(button1, 0, 0)
    layout.addWidget(button2, 0, 1)
    layout.addWidget(button3, 1, 0)

    # ウィジェットにレイアウトをセット
    window.setLayout(layout)
    
    window.show()
    sys.exit(app.exec_())

f:id:yu00:20150917203356p:plain

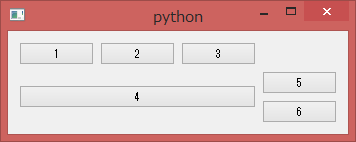
複数のマスをまたがって並べる

addWidget(widget, fromRow, fromColumn, rowSpan, columnSpan)

rowSpan,columnSpan:占有する行数・列数

layout.addWidget(button1, 0, 0)
layout.addWidget(button2, 0, 1)
layout.addWidget(button3, 0, 2)
# 2行*3列またがる
layout.addWidget(button4, 1, 0, 2, 3)
layout.addWidget(button5, 1, 3)
layout.addWidget(button6, 2, 3)

f:id:yu00:20150917203225p:plain

特定の行・列にストレッチを設定する

setColumnStretch(column, stretch)

setRowStretch(row, stretch)

layout.setColumnStretch(0, 2)
layout.setColumnStretch(1, 3)
layout.setColumnStretch(2, 2)

f:id:yu00:20150917203959p:plain

QHBoxLayout・QVBoxLayoutクラス

PyQt5入門 PythonでGUI作成 - yu00’s blog

QHBoxLayout・QVBoxLayoutはウィジェット
横・縦に並べるクラスです.

ここではQHBoxLayoutを例に説明します.

横に並べる

addWidget(widget)

サンプルコード
#! /usr/bin/python3
# -*- coding: utf-8 -*-

import sys
from PyQt5.QtWidgets import QApplication, QWidget, QPushButton, QHBoxLayout

if __name__ == '__main__':
    app = QApplication(sys.argv)
    window = QWidget()
    
    button1 = QPushButton('1')
    button2 = QPushButton('2')
    button3 = QPushButton('3')
    
    layout = QHBoxLayout()
    # レイアウトにウィジェットを追加
    layout.addWidget(button1)
    layout.addWidget(button2)
    layout.addWidget(button3)
    
    # ウィジェットにレイアウトをセット
    window.setLayout(layout)
    
    window.show()
    sys.exit(app.exec_())
実行例

f:id:yu00:20150917163322p:plain

ストレッチを設定しながら並べる

addWidget(widget, stretch=0)

layout.addWidget(button1, 2)
layout.addWidget(button2, 3)

f:id:yu00:20150917163751p:plain

また,追加するレイアウトにもストレッチを設定できます.

addLayout(layout, stretch=0)

vbox = QVBoxLayout()
layout.addLayout(vbox, 2)

表示位置を設定しながら並べる

alignmentを設定することで右寄せや下寄せができます.

addWidget(widget, stretch=0, alignment=0)

from PyQt5.QtCore import Qt
...
layout.addWidget(button1, alignment=(Qt.AlignBottom | Qt.AlignRight))

f:id:yu00:20150917191240p:plain

固定長の空白を入れる

addSpacing(size)

レイアウトの最後にストレッチしない
サイズがsizeの空白を追加します.

    layout.addWidget(button1)
    layout.addWidget(button2)
    # サイズが20の空白を追加
    layout.addSpacing(20)
    layout.addWidget(button3)

f:id:yu00:20150917164522p:plain

伸縮する空白を入れる

addStretch(stretch)

レイアウトの最後にストレッチがstretch
の空白を追加します.

    layout.addWidget(button1, 2)
    layout.addWidget(button2, 2)
    # サイズ1/2の空白を追加
    layout.addStretch(1)
    layout.addWidget(button3, 2)

f:id:yu00:20150917190227p:plain

QLabelクラス

PyQt5入門 PythonでGUI作成 - yu00’s blog

QLabelクラスは文字または画像を表示するクラスです.

QLabelの作成

サンプルコード

#! /usr/bin/python3
# -*- coding: utf-8 -*-

import sys
from PyQt5.QtWidgets import QApplication, QWidget, QLabel

if __name__ == '__main__':
    app = QApplication(sys.argv)
    window = QWidget()
    
    label = QLabel('Label', window)
    
    window.show()
    sys.exit(app.exec_())

実行例

f:id:yu00:20150916205805p:plain

文字の変更

label.setText('my-text')

またリッチテキストと呼ばれる書式を使い,HTML形式で書くこともできます.

label.setText('<h1>my-text</h1>')

f:id:yu00:20150916210641p:plain

画像の表示

QPixmapを使い画像を表示できます.

from PyQt5.QtGui import QPixmap
...
label.setPixmap(QPixmap('my-image.png'))

数値の表示

数値を文字として表示できます.

label.setNum(1.23)

枠線の表示

QLabelが継承しているQFrameの関数を使い枠線が表示できます.

from PyQt5.QtWidgets import QFrame
...
label.setFrameStyle(QFrame.Box | QFrame.Plain)

f:id:yu00:20150916212156p:plain

文字の表示位置の変更(右寄せ,下寄せなど)

from PyQt5.QtCore import Qt
...
label.setAlignment(Qt.AlignBottom | Qt.AlignRight)